Showing posts with label Audrey Inspiration. Show all posts

Sunday, 25 August 2019

Sew It - Vintage Hair Bow Tutorial Part 2

So here is part two of my Hair Bow Tutorial, the written out version, to see the video click here!

~ A Vintage Hair Bow ~

For this tutorial you will need:
• Matching Cotton thread
• A Hand Sewing Needle & Pin
• A Ruler or Tape measure
• Clear nail polish or Fray Check
• An Elastic Hairband
• A pair of Scissors

1. You will need to cut your ribbon in to the following lengths
  • 1 x 2.5" strip
  • 1 x 12" strip
  • 2 x 13"strips
  • 1 x 14" strip

2. Once all of our strips have been cut we need to see the ends, to do this we need to paint the raw edges of the cut ribbon with Fray Check or clear nail varnish, once you've done this you'll need to let them dry for a few minutes before moving on to the next step!

3. Now you're going to need to take one of your 13" strips and place the 12" strip on top. Centre it up so the ends are evenly spaced, as seen at the top of the picture. Now you need to grab your 14 inch strip and fold it in half so that the two raw ends meet in the middle.


4. Pin the bow you have just created with raw sides facing downwards into the centre of the two ribbons you have placed on top of each other, and then stitch these three layers together. Finish by pulling your needle through to the top of your work.


5. Next take the longest piece of ribbon that you have left and fold it in half. Place it over the stitches that you have just made and then sew through this layer and the others a couple of times to attach it to the rest of the bow.

6. Once you have done this take the needle and wrap it around the centre of the bow a couple of times to draw everything together at the middle.


7. That done it should look like the image above, secure thread and cut off.


8. Next you need to attach the short piece of ribbon you have left to the centre of your bow, this can be done with a simple overcast/whip stitch as it will not be visible when we are done.


9. Time to add the hair band, loop the band through the tab you have just created and wrap the ribbon around twice (this will depend on the sickness of your band, a thinner band may need more) until the raw edge is on the back side of the bow.


10. Stitch in place with an over cast stitch, secure thread and then paint the row of stitches with a thin layer of nail polish to secure.

11. Done, time to get your 50s screen starlet on and wear with abandon.

Wendy x

Saturday, 24 August 2019

Sew It - Vintage Hair bow Tutorial Part 1

It's time for a little tutorial, this is one I started back in 2016, shocking I know, but it seems to have become a trait of mine of late!


So I am posting this in two parts; Part one is the video tutorial, for those who find watching someone create something more helpful, and part two with is the pictorial version for those who prefer to read the instructions, just choose which works best for you!


I love this bow, it is really reminiscent of Brigitte Bardot and Audrey Hepburn and gives you an easy-peasy touch of vintage glamour to any outfit! I have worn my lots since I created this tutorial back in 2016, its such a quick way to give your outfit that 60s beat girl vibe which is something I have spent most of my life trying to capture!

You don't need any sewing skills at all for this, you could use a hot glue gun if sewing is not your thing and to make it up will only take about 15 mins, so really you have no excuse for not giving it a go!


I hope you enjoy this video, and if you make one do let me know!
Wendy x

Saturday, 28 February 2015

Things To Do 2015

Hello! How is 2015 been treating you? 
My year so far has been very busy, mostly due to being given extra responsibilities at work, which is great, but a bit more time consuming, but means I haven't had much energy for much else!

So I know it's very late to do a resolutions type post, unless you factor in Chinese New Year "Happy Year of The Goat Everyone!" (which I do as my day job revolves around scheduling for China) but this is, well at least I think it is, a little different. This post is essentially a list of my goals and plans for 2015 things I want to and in some cases have to do. I thought posting them here would help me to clear a bit more head space as my mind is swimming with stuff to do at the moment and it's become quite overwhelming, so I hope blurting it all out here will calm me down and combat the constantly creeping anxiety! Right here's what I have planned...

~ Plan out my new Allotment ~
Late last year I finally got the keys to a new allotment I was really sad to leave the old one but it was certainly time for a fresh start and I hope  some fresh enthusiasm. 
New allotment, I've got it covered

The new plot is a ten minute walk away from where I currently live and is much smaller than my old one in Walthamstow, which should make it more manageable. It will need quite a bit of work to get it in good order as it's covered with grass and brambles, but I am confident that it will be harbouring a luscious victory garden very soon!

~ Leaner and Greener ~ 
As I mentioned above I have been feeling a bit anxious of late, it's nothing new, anxiety is something that's been part of my life for as long as I can remember as I'm prone to panic attacks. This year I have decided to try and address this issue in a different way than I have before by looking at my diet. I have always found that caffeine and sugar play a major role in aiding my anxiety so I want to cut them out as much as I can. I have also decided to eat more veggies and the easiest and supposedly healthiest way to up your veg intake is to drink fresh pressed juices.

Red wine at work!? Ok, it's actually Apple and Beetroot juice

After watching Jason Vale's Super Juice Me, an amazing documentary about how eating right can radically change your life, I was inspired to get out my juicer and recipe books and start juicing again. I did Jason's seven day detox about six years ago when I first bought my juicer, and it worked wonders on shifting the pounds, but it was the hardest thing I have ever done! I think the reason I lost so much weight was as soon as I could eat again I ate super healthy from fear of ever having to do it again! Six years on I decided to do a three day detox (which was more manageable but no more fun) to help kick start my healthy eating plan, and seeing as I have made it to the end of February and am still eating healthily, I guess it's worked! I can't say I am bursting with energy but I certainly feel calmer and a bit healthier than I did, so that's progress!

~ Zen Yoga~
I was very lucky to win the giveaway hosted by the gorgeous May over Christmas and so I am hoping very very soon to pop along one of May's fabulous Cat Pose Zen Yoga classes, as they sound like just the tonic I need to recover from the last few months and reaffirm my resolve for positive mind in the future. I have already been practising her 3 minute Yogic breathing technique which you can watch on May's youtube Channel, and it has really helped to calm me down when I am feeling the stress about to kick in!

~ Bicycle Bicycle ~
The last few months travelling to work as I do by bus (is it weird that I go to work on the bus and then spend all day designing mini ones? If only the big ones were as reliable as the small!) has reminded me of one thing; you really can't rely on buses, especially when they keep going on strike. After multiple six mile walks each way to work and back I decided it was time to seek alternative arrangements, so I have bought myself a folding bike, which will either get me fit, or get me killed!
My new steed
Theoretically it should get me to work in the same time as taking the bus, but without the cold long waits at the bus stop. I have opted for a fold-up bike in the hopes that if it all gets too much, or is raining too hard I can nip on the bus with my folded, yet still very cumbersome bike, I envisage many bruises on my far too sensitive shins!  I have already purchased my bike but now just need to pluck up the courage to tackle London's roads! Meep!

~ Get on an Aeroplane  ~
I am terrified of getting on an aeroplane, just typing this is making me feel queasy. While I am attempting to address my anxiety I feel it's time to be brave and face my biggest demon and get myself on a plane. I have three flights booked for this year, the first is be in May coming back from Rome on a family trip (never been abroad with my family before, exciting) and the other two will be in September when we are all are going for a long weekend to Germany, to see my brother take part in the Berlin Marathon. Deep breath!

~ Parlez Vous Francais? ~
The holiday that my family are taking will involve a few day in Paris (my favourite city, le sigh) so I want to attempt to impress my parents with a bit of French vocabulaire.

Last time I was in France, I used my school girl French to order a meal from a lovely restaurant only to have the waiter laugh in my face, and tell me to speak in English, it was really off putting (I promise my French is not that bad) and lets face it rather rude! Needless to say this knocked my confidence, so once I returned home I decided to invest in some help in the form of some audio CD's by Michel Thomas, it's now finally time to give them a go!

~ Project Audrey ~
I was sent a Boden catalogue a few weeks ago, the moment I opened it I was lusting after their gorgeous French 60's inspired dresses, classic Capri pants and striking Breton tops, all which are stunning but waaaay out of my price range!


Seeing so many lovely outfits re-inspired me to get cracking on my Audrey inspired wardrobe plans. so watch this space!

~ The Vintage Pattern Pledge ~ 
As much as I hate deadlines, I've come to realise over the years, that I am powered by them! More often than not, the only way I will finish something is to have a set date to finish it by, so signing up to the pledge will give me albeit a loose deadline, but one to which I'm more likely to stick to and it should help keep me on track with my Audrey plans!

~ Organise My Sewing Space ~ 
This mission has after years of deliberating actually been achieved! I have finally settled on my perfect space, post soon to follow!


~ Bust Those UFO's ~
I blogged a while back about all the unfinished projects I had found lurking around my home, and to date, I have made little impact on banishing them, so a new year and a new start on getting them out of my way and into my wardrobe!


I am planning to attack one project a month, either finishing it off, calling it quits and re-purposing the fabric or in some cases where they don't fit me, finish them and sell them on Etsy or eBay for someone else to enjoy, which will hopefully give me a few pennies for mooare fabrics!!

So they are my plans, some are exciting others are terrifying, but hopefully, they should make my year an interesting one!

Wendy x

Monday, 20 October 2014

The Hepburn Project - The Audrey Hepburn Story

It was after seeing all the wonderful projects shared over the web for this year's Me-Made May  (I was overwhelmed with just how many people wore homemade all month, you guys are amazing!) that I realised that there was a real lack of practical clothing in my wardrobe, especially separates. I have a lot of dresses which I love and wear, but there are far more dressy 'going out' dresses than I will ever need in my wardrobe.

So when I spotted that Sarah from The Creative Perfectionist was updating her Hepburn Project I was as keen as mustard to join in, I figured it would help to motivate me to create some practical yet pretty separates which could be mixed and matched!

I knew instantly which of the two lovely Hepburn ladies I wanted to emulate, my favorite actress of all time, Audrey Hepburn.

1954 La Vigna, Italy {Image Source}


I have already made myself some Audrey inspired items (this black dress and this eye mask) But when contemplating a wardrobe full of Audrey 'inspired' clothes where do you start?

Well, obviously you go wild on Pinterest, pin everything Audrey related...

{Image Source}

Done.

Then you go back over her films to oggle/research her style a bit more. So today's post is actually a sneaky way of me introducing another Film Fashion Post, remember those! I am actually going to start somewhere you might not expect, with made for TV movie, The Audrey Hepburn Story.


The Audrey Hepburn Story is a biopic from 2000, it stars Emmy Rossum as young Audrey and Jennifer Love Hewitt as the older, as you would expect from a biopic it charts her life from her early days growing up in Belgium and Holland during the war, barely surviving by all accounts, through her early ballet and acting career and leading up to her filming of Breakfast at Tiffany's.

So let's have a quick look at the fashions, shall we ...

Brown Circle calf length skirt, with a white lacy blouse with cute little slit sleeves and round collar, pulled together with a brown leather belt and ribbon neck tie.


I can't be sure if this is a dress or a blouse and skirt as we don't get much of a look at it, but its still lovely! It has a button through front, trimmed pointy black and white polka dot collar and matching sleeve cuffs.


White, head scarf, cream oversized knitted jumper, embellished with red scalloped (looks crocheted) edging around the neck hem and cuffs above which is a red band which has been woven through the neckline and finished in a bow/ Paired with capri pants and red wooden clog shoes.


This outfit is the costume departments attempt to capture the essence of the iconic scene where Audrey sings 'Moon River', in reality, the outfit in the film is much less interesting Audrey's hair is wrapped in a white towel she is wearing grey jersey sweater, with denim capris and ballet pumps.

When Audrey meets Hubert Givenchy for the first time she is wearing a silk button backed blouse embellished with beads around the collar and yoke and a simple grey pencil skirt.

Well, I know this is a dress but it's rather lovely, especially the colour, again more polka dots a full circle skirt topped with a sleeveless bodice and v-shaped neckline which has a slim collar and is gathered by a bow.

I am rather smitten with this little red cap, it looks like it's crochet, but could quite as easily have been woven straw.
The same brown skirt as above, this time, it's worn with a simple yet lovely short sleeve black blouse with buttons down the front and cute little necktie style collar.
A Mid blue V-necked jersey with embellished neckline and a little stand-up collar teamed with a pair of 'classic' Audrey Capri pants.


I honestly set about watching this expecting to hate it, but I really didn't, I actually really rather enjoyed it! The reason I started here rather than with one of her classic films, was I thought it would give me a better idea of what Audrey's most iconic pieces were when distilled through the eyes of the costume department. If someone had to find the essence of Audrey's style what would they pick? what colours would they use and would it be believable?

And I think it certainly is, they have obviously changed a few things but nothing major and it's given me a good starting place for isolating what would make a 1950's Audrey inspired wardrobe.

Bold Colours - Browns, Pinks, Blues, Black & White.
Patterns - Essentially very little in the way of patterns mainly a little embellishment here and there and a few polka dots!
Separates - Obviously!  Full Circle skirts are always worn with a belt; capri pants and short sleeve blouses, with some neck embellishment, tie or brooch.

So now it's time to seek out some appropriate patterns to fit the job and I'll be back with my findings soon!

Wendy x

Thursday, 14 April 2011

Things To Make & Do - Little Black Dress

As it's been a bit quiet on the sewing front of late, so I thought it was about time I shared with you all a dress I made last year for the boyfriend's mums birthday meal. It was made from a Butterick reprint of a pattern from 1952 - Though to me it has got a real 60s feel to it and is really reminiscent of the dress Audrey Hepburn wore in 'Breakfast at Tiffanys'!

{Source}
~ Butterick B5032 ~

With 5032 you get quite a bit for your buck! There is the shift dress, which you can add a chiffon overskirt, to give it a real 50's feel, a cummerbund Sash, narrow belt and a caplet!

 I really love this pattern,  the dress came out just like the drawing, which is so rare! Also, it was very easy to make up, and bar the hemming It was finished within a day! I used a quite thick black brocade curtain type fabric which I picked up from Walthamstow Market for £1 a meter! A total bargain!

 Butterick 5032 Retro 1952 

One thing I don't like though, is the way the skirt pleats make it stick out around the waist making it look puffy, although it does mean you can eat as much food as you like and I suppose it must also make your waist look smaller by contrast!
Puffy Pleats!
My only other gripe is that the neckline does tend to gape a bit at the front, but I guess if I had done a muslin first, I could have probably sorted that, it's those lazy genes again!

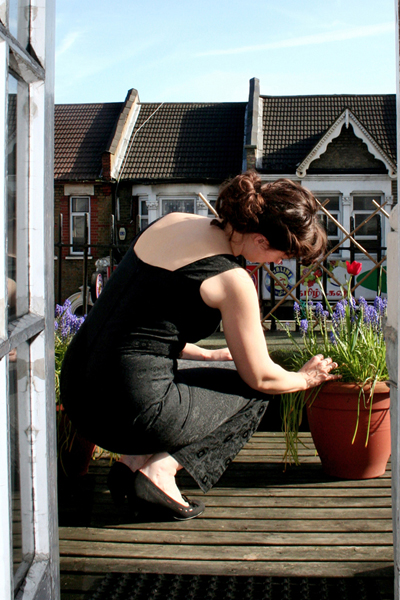
 Now, as anyone who knows me will testify, I HAAATE having my photo taken, I would much rather be behind the lens. But with the weather here in London being all glorious and sunny last weekend, I decided it was the perfect opportunity to take some photos. Also having just bought a new floppy hat (from Sainsbury's no less) I felt a bit more inspired to do some random posing (albeit very uncomfortably) and prance about a la Miss Hepburn on my balcony. 

I'm sure I gave all the people waiting at the bus stop and in the Pizza shop across the road the a jolly good laugh, as I kept popping in and out like a crazed Weather House Woman who seriously needs to join match.com, whilst repeatedly setting the timer on my camera! I must get a remote trigger!

Welcome to my awkward face!?!?


I don't know what I was doing here, but at least you get a view of the back and The Balcony!
 New Hat!! Only £4 from Sainsbury's available in Black and a Browny Beige!
I took off the scruffy raffia band which it came with and swapped it for some black ribbon, so much nicer (shame I tied a very messy bow) and a bit less 70s this way. I think depending on how you dress this hat up it could also pass as 1930s?!

Oh,Where is that Bus?

Right, I am off now to photograph the giveaway prize I have found for you fabulous followers!  It's a very vintage item from 1937 - though it has fared quite well for a 74 year old! I am really excited and I hope you like it!

Enjoy the rest of your week!
Wendy x

Thursday, 21 October 2010

Sew It - The Holly Sleep Mask

It was a few weekends ago now, while spending the day watching Audrey Hepburn films (and generally avoiding doing anything that could be considered as useful) that I was reminded of the wonderfully eccentric sleep mask that Audrey wears in 'Breakfast at Tiffany's'.

After spending a dreary bank holiday in a, cold and very damp tent in Norfolk, lying wide awake by 5.30am every morning due to the light streaming through the thin layer of canvas, I realised I need a sleep mask so that I could stay sound asleep and warm for as long as possible.


Having been obsessed by the sleep mask Audrey Hepburn wears in 'Breakfast at Tiffany's' since I was a child I decided to make The Holly Sleep Mask. The Pattern is definitely inspired by, rather than a copy of the mask Audrey wears, but is just as fabulous and best of all is really easy to make plus it will bring a touch of Glamour to even the coldest of mornings.


~ The Holly Sleep Mask ~

The Butterfly Balcony - Holly Golightly Sleep Mask


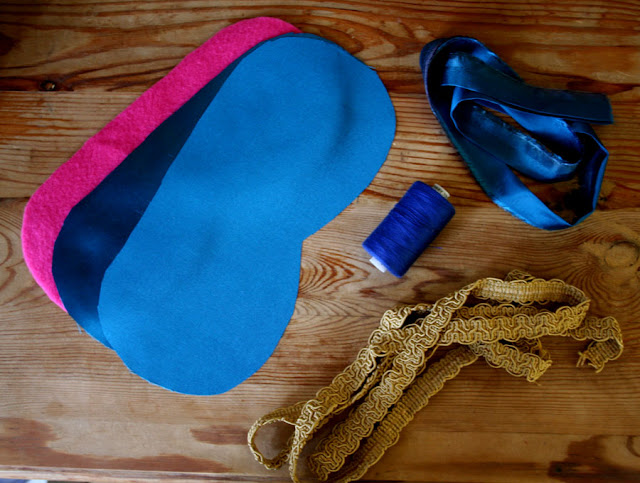
Ingredients: 
The template Found Here
Outer Fabric - I used a cheap blue satin. 
Matching thread 
1" x 24" wide strip of Fabric or length of ribbon (for the ties) 
Padding - Thick Felt, fleece or wadding 
1/2 Meter of Brocade, Ric Rac or Ribbon 

    The Ties
    1. Cut your fabric to 1"x 24". Fold in half (right-sides together) and give a blast with the iron.

    2. Sew down the length and across both ends.

    3. Fold the fabric in half (each tie will be 12" long) and cut across the fold.

    4. Using a blunt pencil or the back end of a knitting needle, turn each tie the right-way out.

    5. Stitch over the raw end to stop it fraying inside the mask once attached.

    The Mask
    1. Fold your outer fabric in half (right-sides together) and give it a quick blast with the iron, this is really useful when using a shiny fabric such as satin as it build up a bit of static which, stops it slipping around as much.

    The Butterfly Balcony - Holly Golightly Sleep Mask
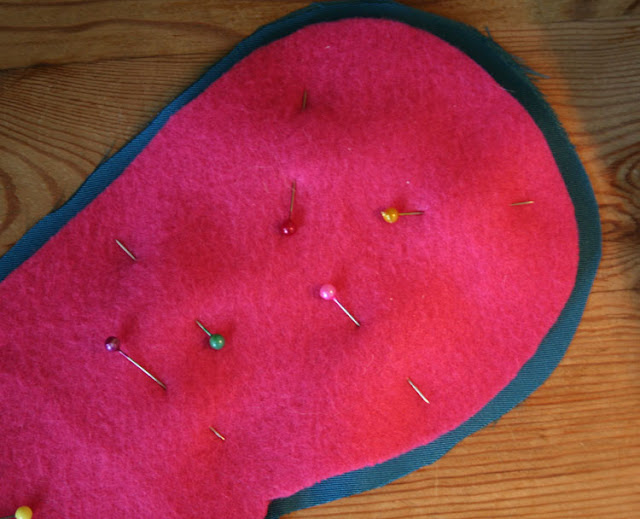
    Padding Pinned to Outer Fabric

    2. Pin the pattern to the fabric and cut making your cut line a little larger than the pattern by aprox. 1/2 cm.

    3. Pin and cut out the padding fabric cut this to the same sizes as the pattern.

    4. Keeping the two outer pieces right sides together pin the padding fabric on to the top.

    The Butterfly Balcony - Holly Golightly Sleep Mask5. Stitch around the edge of the padding fabric leaving a gap on the left and right sides (this is where the straps will go).

    6. Trim the outer fabric close to the sewn line and then zig zag around the edge, following the same line as the straight stitching.

    The Butterfly Balcony - Holly Golightly Sleep Mask
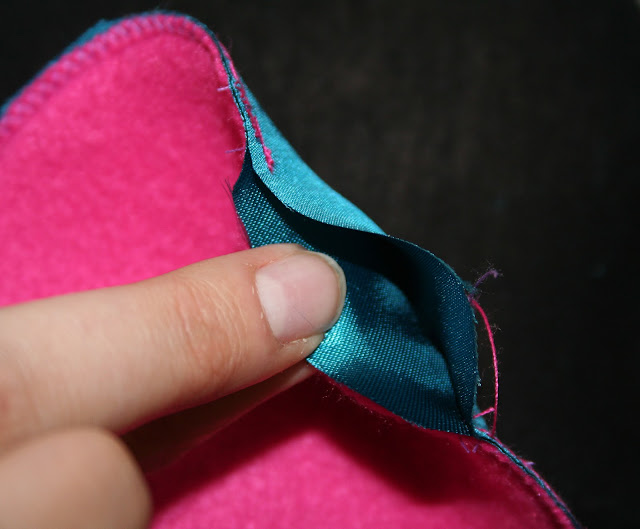
    Gap left to turn right-side out


    7. As carefully as possible, turn the mask the right way out, try avoid pulling too much as it may fray the outer fabric.

    8. Insert the raw end of each side strap in to the gap, turn the edges in so that you have a smooth edge and pin closed.

    9. Sew over the gap either by hand or on the machine - the brocade will cover this stitching so it wont be visible.

    10. Pin your brocade around the front of the mask starting at the nose arch. Once you have got back to where you started, leave a small bit to tuck under to stop it fraying.

    The Butterfly Balcony - Holly Golightly Sleep Mask
    Pined and ready to be hand sewn.
    11. Hand sew your brocade to your mask with a matching thread. Making sure that the ends are tucked in neatly then your done!


    If you did want to make your mask more like the original, I am sure it would be quite easy to do, following the same pattern but using a light blue felt for the main fabric, use felt triangles for the eyelids with a large glass beads underneath and use gold Ric Rac for the brows and trim!!

    Now your ready to sleep in till noon and then have your breakfast (well lunch) at Tiffany's!!

    Wendy x