Saturday 20 August 2016

Read It - Sew Over It Vintage

Today I am sharing with you a review of Lisa Comforts Sew Over It Vintage, it's a book I bought for myself a little while ago now and I have used to great effect to make my recently blogged about 1950s Box Pleat Skirt - the first ever truly self-drafted pattern I have made! So I thought it would be a good time to give you all a look at the other wonderful patterns contained in this book!

~ Sew Over It Vintage ~
Stylish Projects for the Modern Wardrobe & Home

By Lisa Comfort
Published by Ebury Press June 2015
RRP £15.00

'Sew Over It Vintage is a brand new collection of fabulous projects from sewing expert Lisa Comfort. Inspired by Lisa’s love of vintage style and fashion, the stylish projects each have a vintage twist but still retain the modern style, allowing these pieces to work with and complement the rest of your wardrobe and your home. Featuring 25 projects, ranging from jewellery, hats, tops, dresses and bags, to cushions, lampshades, placemats, lanterns and a luxury chair pouffe, there are ideas for those who want to quickly create an accessory on a lazy afternoon as well as suggestions for those that want to invest their time in a large and impressive project. Every project has a clearly labelled skill level as well as step-by-step photography, ensuring the directions couldn't be any easier to follow. And with instructions on how to draft your very own bodice block, all the clothing can be made to fit your body shape perfectly. There is no better way to inject some classic vintage style into your everyday life.' (Ebury Press)


The book opens with a quick and a rather lovely introduction to our author and sewing teacher Lisa Comfort, where she talks about why she wrote this book and why she loves vintage.
It is followed by some quick chapters on 'In your sewing box', a Glossary of stitches, How to Measure Yourself, Pattern Cutting Tools, an Introduction to Pattern Cutting, and Cutting Guidelines.


~ Dabble With A Bit Of Vintage ~
This chapter focuses on adding vintage embellishments to existing garment and is designed to ease you in gently to the wonderful world of vintage sewing with three Easy and one Intermediate project.

Adding Fur Cuffs & Collar To a Coat (Easy) // Adding a Peter Pan Collar to a Top (Intermediate) 
Vintage Brooch Embellishment (Easy) // Glam Up A Breton Shirt (Easy) 
~ Make A Vintage Inspired Wardrobe ~
This is where we get to the good stuff, the vintage patterns! This is where all the pattern drafting truly begins, which also means that these patterns are all marked Intermediate to Advanced on the skill level.

1920s Anita Tie Top (Intermediate) // 1950s Sally Sailor Blouse (Advanced) // 1930s Cowl-neck Dress (Advanced) 1920s Kimono (Intermediate) // 1940s French Knickers (Advanced) // 1950s Button-up Skirt (Intermediate) 
1960s Pleat Dress (Intermediate) // 1950s Cardie Dress (Intermediate)
1950s Capelet (Advanced) // 1950's Box-pleat Skirt (Intermediate) 
~ Something To Go With It ~
This chapter is dedicated to making accessories that would go really well with the new self-draft vintage wardrobe you've just created! Alternatively, as most of these patterns are marked Intermediate or Easy, so if new to sewing this chapter might be a good place to start!
1940s Fascinator (Easy) // 1970s Clutch (Intermediate) 
1960's Fur Hat (Intermediate) // Vintage Lace Necklace (Easy) 
Vintage Curtain Handbag (Intermediate) // Veil with Vintage Buttons or Brooches (Easy) // Vintage Cotton Men's Tie (Easy)
~ Vintage Home ~
The last chapter in the book contains, patterns to give your home a little vintage flare!
Vintage Fabric Lampshade // Lace Lanterns (Easy) // Doily Placemats (Easy) // Applique Quilt (Intermediate) Piped, Zip-fastening & Envelope-back Cushions (Advanced, Intermediate & Easy) // Patchwork Pouffe (Advanced) 
The last few pages of the book are where you'll find the re-sizable templates for the smaller projects and a glossary of suppliers and stockist.

~ The Good Points ~
~ It's beautiful! Every project is photographed to perfection, utterly enticing you to make it up!
~ The book is designed to teach you not to be afraid of self-draft patterns. Apart from a few templates, everything else relies on you taking your own measurements and then working them into drafting your chosen pattern.
~ Lots of projects! There are 29 patterns in all which is a really good amount, especially considering there are enough patterns to enable you to make a complete wardrobe of garments if you so desire!
~ It's a nice sturdy hardcover book, with thankfully no dust jacket!
~ All projects are ranked from Easy, Intermediate, to Advanced, so there is something there for every skill level.
~ Lisa has made a lovely little video on her Sew Over It YouTube channel to promote the book and so you can see some of the projects in real life, as it were! Her channel is also amazing for sewing tips or if you are just super nosey like me and want to see what she has been making!
~  If you fancy trying before you buy you can download the Antia 1920s Tie Top and The 1920s Kimono tutorials for free from Make It Todayjust create a login and they are yours!


~ The Not So Good Points ~
~ There could be a few more garment photos showing the construction a little better. When making my version of the box pleat skirt, I did struggle at times to visualise certain parts, some good all around photos would have really helped.
~ There are a few, to my mind, filler projects: Broderie Anglaise wrapped glasses and attaching a skirt to a cardigan (think of the nightmare of laundering such a piece) are nice but not really what I am looking for in a sewing book.
~ There are no pattern pieces given for the Applique Quilt which is a shame as it's one of my favourites out of the homeware projects.
~ I noticed on the Amazon reviews of this book, that one reviewer mentioned the patterns didn't work on her more voluptuous frame. Lisa is a UK size 8, so it may be possible that some of the garments don't look as flattering when graded up into much larger sizes.

~ My Verdict ~
Lisa Comfort's Sew Over It Vintage is a lovely introduction to the wonderful world of vintage sewing. The range of projects offered in the book are diverse enough for everyone to find something that matches, or even pushes their current skill level, and also means that if you wanted you could quite easily create a whole wardrobe of simple, but beautiful self-drafted clothes from this book alone. There are a few filler projects but they in no way detract from the quality of the other projects. If I had to choose a couple of favourite patterns, it would have to be the 1950s Box Pleat Skirt and the gorgeously drapey Anita Tie Top, though it is a difficult choice as there are soo many pretty patterns to choose from.


The question of larger scale grading is one that should be addressed. I have not found this to be a problem personally. I am a UK size 16, miles away from the size 8 of lovely Lisa Comfort, however, I was able to make up the box pleat skirt with no real fitting problems at all. It may be a little less flattering on my much more hippy frame, but I still think it was worth making and truly love wearing it. 

Sew Over It Vintage is a lovely little book to have in your collection. I would definitely recommend getting a copy, as it offers a great range of patterns and gives you the chance to expand your sewing confidence by venturing into pattern-drafting, which in turn opens up a whole world of possibilities for creating your own self-drafted garments - what more could you want from a sewing book!


I hope that you enjoyed this review and if you have been pondering buying this book I have helped you to make a more informed decision!

Have you got a copy of this book, what did you think?

Wendy x

Friday 12 August 2016

Sew It - 1950s Box Pleat Skirt

Today I am finally going to give you all a proper look at my Sew Over It Vintage, 50s Box Pleat Skirt, which I finished a few months ago now and have worn almost constantly since!

~ 1950s Box Pleat Skirt ~
Pattern: A self-draft 1950s Box Pleat Skirt from Sew Over It Vintage
By: Lisa Comfort
Fabric: Approx 1.5m Thick Red Crepe from Walthamstow Market £1pm
Tools: Paper for Drafting the pattern,
Ruler or tape measure,
9" (23cm) invisible zipper,
Lightweight interfacing

The Butterfly Balcony: Sew It - Sew Over it Vintage 1950s Box Pleat Skirt Pattern Review


The fabric for this skirt was originally bought to make my ill-fated 1950s Jubilee suit, which I listed in my much talked about, UFO Hall of Shame post. I decided to scrap this project, after I gave inserting those sodding, set-in-sleeves one last try, after failing again I decided to throw in the towel and to repurpose the remaining fabric into this skirt - I can't exactly remember how much fabric I had left, I think I had about a meter and a half.

The Butterfly Balcony: Sew It - Sew Over it Vintage 1950s Box Pleat Skirt Pattern Review


 It was the first time I have attempted - a completely from scratch - self-draft pattern and so I was nervous, to say the least. My math skills are pretty limited and so I feared that my measurements may end up going awry. I needn't of worried though, as the skirt is very simple and essentially made up of various sized rectangles which means there is very little that can go wrong. The only issue I have is that I sized the waistband a bit too big and so it's rather too loose (I pinned it for these pictures) so that is something I want to go back and fix at some point soon.

I was a little concerned when starting, as even though the construction instructions (say that three times fast!) are very detailed, there aren't really enough clear photos of the finished garment for you to get a good look at the overall construction. So in my ignorance, I'd convinced myself that the closing zipper was at the side (vintage style) rather than the back and so spent more time than necessary scratching my head before the penny finally dropped. I will say the instructions in the book for inserting an invisible zip are marvellous, very clear and concise meaning that this is the best one I have ever sewn. It also helped that I recently treated myself to an invisible zipper foot - honestly, do yourself a favour if you haven't already, get one they make inserting zips a breeze!

The Butterfly Balcony: Sew It - Sew Over it Vintage 1950s Box Pleat Skirt Pattern Review

Once I'd figured out the main construction, the skirt was very easy to sew together and probably took time wise, a little over a day to finish, all barring the hem. I left the skirt to hang for a day or two before attempting hemming, but it still became a bit of a nightmare to finish.

Usually, I add a few extra inches to the length of my skirt patterns, to account for my taller than average frame, this does normally work out well and gives me a bit more leeway when hemming. But on this pattern I found the extra length made it far too long; the combination of front pleat and extra length created a really ugly effect, as the front pleat is only secured at the waistband it drapes out from there, adding extra length made this splay out even more at the hemline giving the skirt an odd boxy look.

The Butterfly Balcony: Sew It - Sew Over it Vintage 1950s Box Pleat Skirt Pattern Review


 So I decided to cut off a couple of inches so that the skirt would finish just below my knees rather than mid-calf, which was where I hit my next snag. Due to the gathers around the waist and the fact the hem is cut on a curve, I just could not cut the hem so that it was level, I was starting to pull my hair out at this point as I was convinced it would never get it finished and if I kept cutting to rectify, it was soon going to be a mini rather than a midi skirt!

Eventually, I decided to try another approach.While the skirt was on my dress form I turned up the hem, ironed it flat to check how level it was, then hand basted it into place. Next, I trimmed off some of the excess with my overlocker, making the hem neater and narrower before I whip stitched the overlocked edge into place and then removed all the basting stitches. It worked, in the end, but blimey it was a battle, and one I have to say was completely of my own creation!

The Butterfly Balcony: Sew It - Sew Over it Vintage 1950s Box Pleat Skirt Pattern Review

The only regret I have with this skirt is that I wish I'd put pockets in the side seams, as they are so useful (especially for awkward photo posing purposes), but I am happy with it and love the fact that it goes well with a lot of things already in my wardrobe. I also love that it's smart enough to wear to work but also relaxed enough to wear for a day trip out or to the pub (or more likely in my case on a trip down to Tesco's) I was especially pleased when the red matched up with my victory sweater as it will mean they will both get lots more wear throughout the year!

Oh, I have just spotted that this skirt is the same as on Lisa's newest pattern release The Rosie Dress, so if you fancy making the skirt but don't fancy a spot of self-drafting then that's the pattern for you!

Wendy x

Sunday 7 August 2016

European Adventuring - London to Paris

With all the turmoil we have been facing in the UK over the last few months, after the vote to leave the EU (I refuse to use that horrid abbreviation), I thought it might be a good time to give you all a little glimpse into the wonderful European adventure I took with my family last year, to show those in any doubt (surely there can't be many?), just how wonderful our neighbouring countries are and just how much I love being part of Europe.

Paris // Zurich // The Alps, Switzerland //Millan // Tiber river // The Colosseum

It really was the holiday of a lifetime. We spanned three European countries in our ten-day trip and saw some of the most beautiful places I have ever seen. Our journey was inspired by my dad and brothers mutual love of Michael Portillo's Railway Journeys, watching this show together is their bonding time, and so our route was planned to encompass as much as we could of their favourite sights from the show.

London - Saturday 23th May 2015
At all began on a rainy morning in the heart of London, outside King's Cross Station to be exact, where we met to embark upon our European rail adventure. As we passed through customs and boarded the Eurostar bound for Pairs on the 1.15 train, we were all feeling a little apprehensive; this was a family first, we had never been abroad together before and were a little unsure as to what to expect from the trip and each other. My brother James was the mastermind behind the organising and booking, as he is the most well travelled among us, so we were trusting him to look after us and have everything under control (spoiler alert He totally did!).


The journey was perfect, we arrived in Paris a mere two and a half hours later, after pleasantly watching the French countryside whiz by in the spring drizzle and occasional sunshine. On arriving at Garde du Nord, with watches (OK mobiles) set to European time, we went in search of the famous Metro and the ticket (billet) machines. This proved more complicated than we had anticipated; fresh off the train we were all a little nervous about asking for help, instead we muddled through and somehow managed to buy the single tickets we needed for the journey to our hotel. Tickets and suitcases in hand, we hopped on the Metro to Châteletwhere we changed for a connecting train to Port d'Italie.

You can download a PDF of the Paris Metro from Here


On leaving the station, we made our way to our hotel. No, let me start again, what we actually did was wander around and around a rather 'attractive' dual carriageway in ever decreasing circles for about an hour. We later learnt that we could have used a different exit at the station and made much lighter work of this endeavour; however, we did eventually hit upon the correct direction and made our way to the Ibis Paris Porte d'Italie. Once inside we discovered a lovely and spacious hotel (the reward for booking on the outskirts of Paris) which quickly banished any anxiety that we might spend the night sleeping under that dual carriageway! After a little siesta and a wash and brush up, we headed down to the hotel's restaurant where we had our first French meal of the trip, once we had figured out how to order!

Travel Tip: If staying at an Ibis Hotel in Europe, there is usually also a Budget Ibis close by; sometimes it's right next door and sometimes it's a mile in a different direction! Your GPS mapping thingy may be confused by this, as will some people you ask for directions, so do double check the address and which type of Ibis you have booked before setting off on a long, long walk in the wrong direction, with all your luggage like we did!

Paris - Sunday 24th May 2015
Parc Kellermann

After a good nights sleep we set off bright and early towards the Metro, which we now found could be reached from the bottom of the road after a pleasant stroll through the beautiful Parc Kellermann, a real tonic compared to the chaotic route the day before, and made us aware that the area we were staying in was actually quite nice, nowhere near as rough and ready as we had thought!

Eiffel Tour
After purchasing a one day Metro ticket (€7 each) from the ticket office (the machines seemed only to offer single trip tickets, so I mustered up the courage to try out my French, not that my family who I was quietly trying to impress were even paying attention, C'est la vie!), we made our way via Place d'Italie to Bir-Hakeim the best stop for the Eiffel Tower. We walked along the main road and encountered our first street traders of the holiday, selfie sticks and Eiffel Tower ornaments abound. After battling through them, being as polite as our well brought up English demeanour allowed, we made it to the tower which was carpeted by a sea of tourists. We grabbed some breakfast/lunch from a Kiosk and then made our way to a shady seat adjacent to the tower from which we could see the grand structure reaching into the sky between the trees, the weather was perfect and our fresh baguettes were delicious, so it was bliss!

Believe it or not, this is the best photo of us all! We took a few and not in one are we all looking happy, but this one makes me laugh so I am sharing it!
After lunch, my brother and dad went off to find the tour group with whom they'd booked tickets to scale the tower. Mum and I, not being fans of great heights, opted to sit and watch the world go by until they returned. When the wind picked up a little, we decide to go for a walk down to the main stretch in front of the tower, where the hoards of tourists were milling about. We sat for a  short while basking in the warm sunshine until we could take the pestering from the beggars and the selfie stick sellers no longer and returned to our seat in the shade. On the boy's return, they told us they had a great time and expressed their wonder at the beautiful views across Paris. Mum and I were quite content just to look at the pictures.

Mum & the Tower // Me, James & Mini Stee // The View from the top


Our next plan was to catch the RER to St Michael Notre Dame. The platform at this station was very long and the train was built to match it. As we were waiting at the end of the platform, on a bend where the driver couldn't see the end of the train, and because it took so long for the passengers to depart, there was almost no time for boarding, which meant James and dad were the only ones to get on. I'd kind of got on, as I'd managed to get myself wedged in the closing doors (it wasn't just my top that had blue stripes on that evening I can tell you!) but somehow, thankfully, I'd managed to get back onto the platform with mum to wait for the next train. Deciding that the train to Notre Dame was going to be too long a wait, we chose to get on the very next train which was terminating a few stops earlier; reasoning that it would be the same platform and we could wait there just as well as here.

Notre Dame Cathedral


When we arrived we realised this was a massive mistake, the train we were on had pulled into a siding platform and there were no legible signs to suggest where to go - eek! Luckily we managed to find a Guard who was helping some other befuddled English tourists, and by listening intently we managed to decipher a platform. Eventually, quite shaken by our little detour, we managed to meet up again much to mum and my relief. The boys, however, were totally unconcerned about leaving us behind and had even bought themselves a bag of Haribo to eat while they waited for us to arrive! Once, thankfully, out of the station, we walked around the magnificent Notre Dame cathedral and after a few wrong turns, around the ÃŽle de la Cité, we found the entrance to our next destination- Sante-Chappelle.

Sante-Chappelle


From the street, you would have no idea what beauty lies hidden behind the more modern, but still super old, buildings. The only clue that there is something special awaiting you is the length of the queue, which stretches up the street. Once in the grounds, you get your first true glimpse of this Gothic, gargoylian masterpiece. Built around 1238 (taking only seven years to complete) it was commissioned by Louis IX of France to hold his sacred Christian relics, such as Christ's Crown of Thorns. Now I have to say, that the French really knew how to house a sacred relic in style, as once you step inside the true beauty of this building is revealed in all its breathtaking glory.

Sante-Chappelle Upper Chapel

After passing through the beautiful lower chapel and climbing the twisting spiral staircase up to the massive upper chapel, we were immediately awestruck by the overwhelming beauty before us! The upper chapel has 15 windows, each 15m high and all depicting scenes from the bible in the most beautiful and detailed stained glass I have ever seen. It's simply breathtaking, worth every Euro of the €8.50 ticket price and every minute of the hour-long queue. We were actually lucky to see it as it had been closed for months whilst undergoing restoration, and had literally just opened back up that week. If you're in Paris and you get the chance, religious or not, it's somewhere truly worth adding to your sightseeing list!

Sante-Chappelle upper & lower chapel

Once outside, in the slightly less colourful Parisian daylight, we headed across the road to the Brasserie Les Deux Palais, where we had a dinner of ham baguettes and coffee. It was then time for a leisurely rambling stroll around the streets and along the Seine. We walked across to the south side of the river passing rollerskating street performers and a musician playing a piano in the middle of the bridge, it was so wonderful and so French!

Batobus Hop on, Hop off River Boat Shuttle Service

We decided to make our way to the nearest river cruise company for a relaxing bob along the Seine and this is where we found Batobus Paris, located at the Hotel De Ville stop. The tickets were a little expensive at €16 each but they can be used all day for hopping on and off at different locations along the route, so if bought in the morning they would be better value!

Bobbing along the Sein
Our twilight river cruise was lovely. We were able to take in some of the best sights from a new angle. The only downside, was that at this time the cruises were no longer going along to the small-scale Statue of Liberty on the ÃŽle des Cygnes, so we missed the fab view of the statue with the Eiffel Tower in the background, something which had stuck in my mind from my very first trip to Paris many years ago. My family were none the wiser to what they had missed, so they were not disappointed.


The Louvre at Night
We decided to depart the boat at the Louvre so that we could see a little more of Paris before returning to our hotel. It looked so spectacular lit up and it was blissfully quiet with only a few tourists milling about. As soon as we returned to our hotel, we ordered some Earl Grey tea before bed, it had been a very long but fabulous day!

On the Metro
Travel Tip: If you are wearing a Breton stripe (surely it's 'de rigueur' that most women will get the urge to do so when travelling to Paris) be prepared to be asked directions or for the time (at least in hindsight I think that's what I was being asked) by many Parisians. I was mistaken for French more times than I can remember; which might have as much to do with the fact I was in France as anything, but I am sure the stripy top helped! Don't get me wrong I was really rather flattered, it's just I felt an utter fraud when I had to wheel out my go to "Je suis désolé, je ne parle pas français" (I am sorry, I don't speak French), it's certainly a line worth learning rather than blankly staring back at a poor confused Parisian.

The next day we left the hotel and made our way to Gare du Lyon, in preparation for catching our next train. Before boarding, we hastily grabbed some sandwiches from the stations Pret a Manger (which we discovered is a British company) and then had a quick coffee in the Costa (also a British company, so much for eating locally!). All that was left was to board the SNCF to Zurich, say 'Au Revoir' to Paris and watch as the grey cloud and lush green French countryside flew by our picture window. Switzerland, here we come!

Wendy x

Thursday 4 August 2016

Knit It - Women's Land Army Pullover

I made myself a little promise earlier this year, to try and become a monogamous knitter, you know just one project on the needles at any one time, so that I never have to have such a long guilt-inducing list of UFO's ever again, so far it is working out OK. I should point out I didn't make the same promise regarding sewing projects, I know myself well enough by now to realize I'd fail miserably at that! 

So today's post is about a very special UFO, one that's been on my list since 2011 (only five years) and now complete, it marks the very last UFO on said list to be ticked off! Hurrah!

The Butterfly Balcony - Knit It -  Free Women's Land Army Pullover Pattern

~ Women's Land Army Pullover ~
Pattern: A V-necked Pullover by Jaeger Hand-Knit No.44, Essentials for the Forces
Size: Pattern 35" Bust -- Size Made 37" Bust
Yarn: Bottle Green 2ply knitting machine yarn

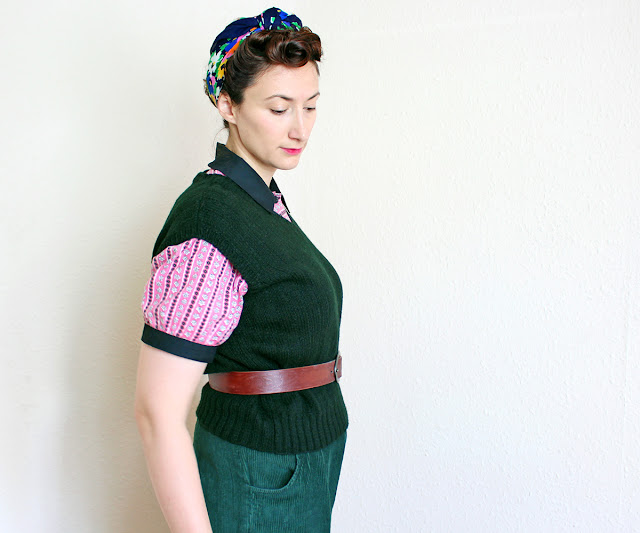
It was February 2011, if Ravelry is to be believed, that I cast this poor jumper on. For years I'd longed for a lovely Women's Land Army Jumper in a glorious bottle green, and as I'd just begun working on my new allotment, I felt it was time to give knitting one a try!

So, I set about scouring the Internet for an original pattern, but being 2011 there was a lot fewer free or paid for PDF vintage patterns available online, so I struggled to find much that was suitable. I'd seen a few of the officially issued jumpers for sale on eBay, so I knew that the original pattern was for a long-sleeved, V-necked, K1. P1. ribbed jumper. I also knew that the standard issue ones would have been machine knitted, due to the sheer volume produced, so I reasoned that there may well not be an original handknit pattern out there and so settled for this V-necked Jumper pattern from the V&A's knitting archive.

The Butterfly Balcony - Knit It -  Free Women's Land Army Pullover Pattern


When it came to getting the right yarn, here I also struggled. I am going to say it again, but back in 2011, as hard as it is to believe, there was nowhere near the amount of 4ply yarns available as there is today. Much of what was available was in baby shades of pinks, blues, and yellows, there were very few in more grown-up colours. I struggled for weeks, trying to find the right ply to match the pattern with the right hue to match that which the WLA's jumpers were renowned for. In the end, I found a seller on eBay who had some 2ply bottle green knitting machine yarn for sale, so I settled for that knowing once I balled it up, off the massive cone it came on, I could then double it up to reach the 4ply thickness the pattern required.

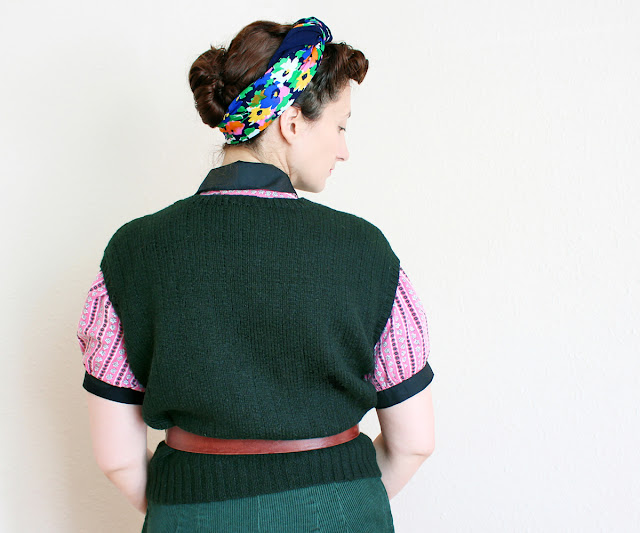
So I cast on and got knitting, I actually blogged back then about how I was planning to see just how quickly I could knit this up, haha, the naivety! I knitted the back quite quickly, for me, but then I stalled on the front only finishing it in July of the same year. And so that is how it has been left until a few months back when I decided rather than waste any more time knitting sleeves, to turn it into a pullover by knitting ribbing around the armholes and neckline.

The Butterfly Balcony - Knit It -  Free Women's Land Army Pullover Pattern

The pattern is a very simple one, after the 2 by 2 stitch ribbing for the waist, you move on to the body of the jumper which is knitted in a slip stitch style wide rib, which is what gives the jumper the channels which run up the front. Knitting this pattern was a little tedious, due to the spacing of the slip stitch channel, for some reason I found it very difficult to get into a rhythm with it and so spent much of my time undoing rows where I had, slipped up - Excuse the pun!

The Butterfly Balcony - Knit It -  Free Women's Land Army Pullover Pattern

Also due to me using knitting machine yarn, the feel of the jumper as it was being worked was very rough and itchy, this is partly to do with it being 100% wool in its makeup, but also due to the fact knitting machine yarn tends to be coated to make it smoother helping it to glide through the machine without snagging, and so once washed and blocked the finished garment should soften up, which this pullover has, but not by much.

The Butterfly Balcony - Knit It -  Free Women's Land Army Pullover Pattern

Now it's done I am really glad, but now it's done I can see just how bad my re-sizing was and how it really doesn't fit me that well at all! The shoulders are too wide (something sleeves would have distracted from I think) and so is the main body, it's all just a little bit too big for me and is way off from being a 37" bust more like a 42". If I am honest I know there are two simple reasons for this. One, I think that rather than just adding 2" overall, I added 2" to both the front and back. Two, I didn't do a test swatch, I just assumed that by adding more stitches it would all work out OK, but as I never checked to see how loose my tension was compared to the pattern, it was always unlikely it would come out the right size! Again, the naivety!

The Butterfly Balcony - Knit It -  Free Women's Land Army Pullover Pattern

So there you have my last UFO. I can't say that I love it, but I'm not too disappointed, as I ought to point out that this was the second ever jumper I'd attempted to knit and my first attempt resizing a vintage pattern, so perhaps I can forgive myself for its inaccuracies. It is still wearable, with a belt, and I guess you can't always love everything you make. I have since stumbled upon the official handknit pattern - find it for free here - and as I do still really want a Land Girl Jumper, I think I'll give it a try, finding a 4ply bottle green yarn should certainly be much easier in 2016 - well at least I hope so!

Wendy x