Tuesday, 11 December 2012

Things To Make & Do - Tin Can Lanterns

Hello, there I hope your all well and getting excited about the festivities ahead!

I apologise for the lack of blogging and blog reading (1000+ posts in my reader, eeek!) going on around here I hope to remedy it soon! I am currently having trouble with my computer (what is it about windows PCs that makes them gradually grind to a complete halt!) fingers crossed a shiny new laptop will be on the horizon, but until then I am having to resort to spare moments on lunch breaks at work to do any internet related stuff, which is not nearly enough time to do all that I want/need to!

Anyway, I promised this tutorial a long time ago and rather than let it sit in my draft folder any longer I thought it was about time to publish it!

Tin Can Lanterns

These are really the most versatile decoration ever as you can keep using them all year round! (...hung from trees at a BBQ, lining a garden pathway for an evening party, on the table for a romantic meal...) You could also spray them up to match your colour scheme. What better way to use something that you were just going to throw away recycle!

And the best bit is that these are SO easy to make!! You can use any design you like (... stars, Xmas trees...) just mark your can up first and get punching! I went for a simple pattern using the cans ridges to space out my holes, I didn't worry if it was accurate as I think it being a bit wonky adds to the charm! But if you feel you have made a terrible mistake with the pattern, it's no problem, just pop the can into the recycling and save the next can you open...really what could be less stressful!


Ingredients:              
                        Tin Cans
                        A Felt Pen
                        A Hammer
                        A Large Nail or A Small Cross Head Screw Driver (my weapon of choice)
                        A Towel.

Note: If you want to hang these up you must put two holes opposite each other at the top, BEFORE you defrost your can, as there is no refilling it with water once is all holey - I learnt the hard way so you don't have to;).


Wendy x

Sunday, 25 November 2012

The Kitchen Front - 10 min Christmas Pudding

Today is 'Stir-up Sunday' the traditional day for getting in the kitchen and mixing up your Christmas pud, ensuring it has a month to mature for its big day. Tradition dictates that everyone in the family gets a turn at stirring the mixture whilst making a wish. I can't confess to have ever partaken of this particular tradition myself, generally, my Christmas pud comes wrapped in plastic from the local supermarket and seldom gets eaten until the next day!

Love it or hate it Christmas would just not be the same without the classic Christmas Pud, and this blogger would not be the same if it was not for the wonderful recipes of Marguerite Patten CBE.


Ain't she adorable! (Image Source)
This legendary lady first became famous during WWII with her work with the Ministry of Food, where she advised families how to manage on rations whilst gaining the maximum nutritional value from what little food they had. Her brief was to 'inspire people' and she certainly did that and let's face it she still does!

So you can imagine my delight when I stumbled across the fabulous 'Pud-cast' below, which she made in 2006, when she was a mere 91 (that must be a record surely) and even at her advancing years she proves you are never too old to embrace modern technology, so if the estimable Marguerite is not afraid of a bit of culinary corner cutting then who am I to argue!


Ingredients
  • 65g of Butter
  • 50g of flour (preferably plain)
  • A teaspoon of mixed spice
  • 75g of soft bread crumbs
  • 100g of soft brown sugar
  • 150g of sultanas
  • 75g of raisins
  • 50g of currents
  • 25g of chopped peel
  • 50g of soft dates chopped up into small pieces
  • 50g of glacier cherries
  • 2 tablespoons of black treacle or golden syrup
  • 2 eggs
  • The juice of half a lemon
  • 2 tablespoons of orange juice
  • 75ml of apple juice
    Wendy x

    Tuesday, 13 November 2012

    A Girl With A Curl

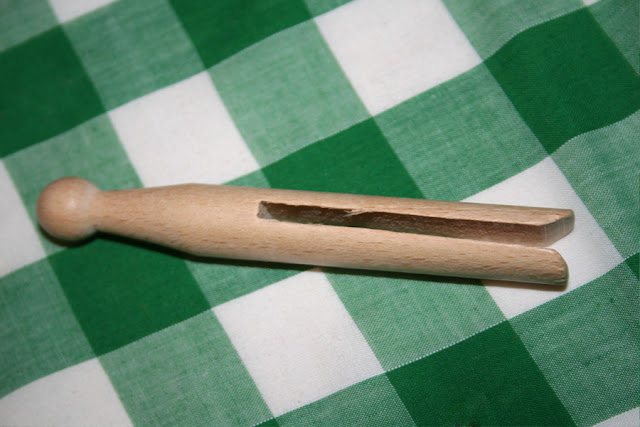
    When visiting my parents earlier this year, I found a bizarre looking tool whilst searching in hope for  some long lost hair grips in my mum/grandma's old curler bag. I remembered having found it when I was a child and wondering then what the heck it could be... some torturous beauty device no doubt, perhaps for cleaning out your ears or plucking your eyebrows?

     Well no. After 20 (alright 25) years later I have realised exactly what it is.

    How to make pin curls with a dolly peg 1940's hair tutorial Easy and Cheap pin curl tool
    This, in fact, my Grandmas pin curler tool. You could even say it's a family Hair-loum! I know, I'm hilarious!
    Shamefully I've never been able to do a pin curl to save my vintage loving life. No matter how many attempts I have made, tutorials I've watched, I still remained all fingers and thumbs inept at the simple pin curl. I toyed with the idea of buying the fabulous new 'Sculpture Pin Curler' Tool, as it has had such wonderful reviews all over the web (see Land Girl's review) but the price tag has put it out of my reach for now, anyway I had my Grandma's pin curler tool just sitting there unused and unloved for the last 70 years, it was about time I at least gave it a try.
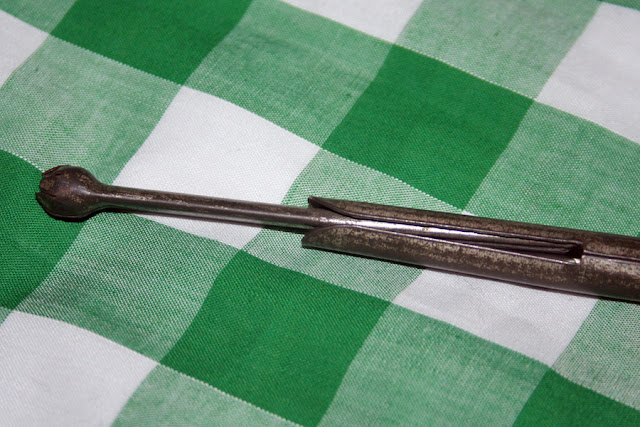
    How to make pin curls with a dolly peg 1940's hair tutorial Easy and Cheap pin curl tool
    You tuck the hair between the metal bar and the clip bit, so that as you roll the ends stay put, then once you've reached the top you slide the hair off and pin in place...well that's my best guess at how you use it anyway!
    Try I did. After a bit of practice, I found that it was very easy to use. The only problem was with my hair being super thick and quite long (even though I've cut 4" off recently), the curls it makes are very small and tight and so a pain in the derrière to pin to my head. Grandma always had rather short hair so it would have worked wonderfully for her, unfortunately, me and my thick hair were going to need something a little bigger in diameter.
    1930's Photo of my lovely Grandma, with beautifully coiffured hair!
    Looking at it I realised there is some thing very similar that most of us would probably have had in our possession at one point or another - most likely as a child, it would usually be decorated with a face, dress, and pipe cleaner arms, well in our house it was - It's a...


    How to make pin curls with a dolly peg 1940's hair tutorial Easy and Cheap pin curl tool
    Dolly Peg! Ta-dah!
    Ok, Ok, it's not mind-blowingly fabulous and I am sure I'm not the first to have thought of using it, but the humble Dolly Peg does make a perfect pin curler tool!

    After a few attempts, I have it pegged! (the jokes are just getting better) So for the first time in my life, I can say I have a pin curled set that I am proud to be seen outdoors with! Another first is being able to do those volumising lifted curls, flat was all I could manage before and a bad straggly flat at that!
    Not too dissimilar, I think you'll agree!
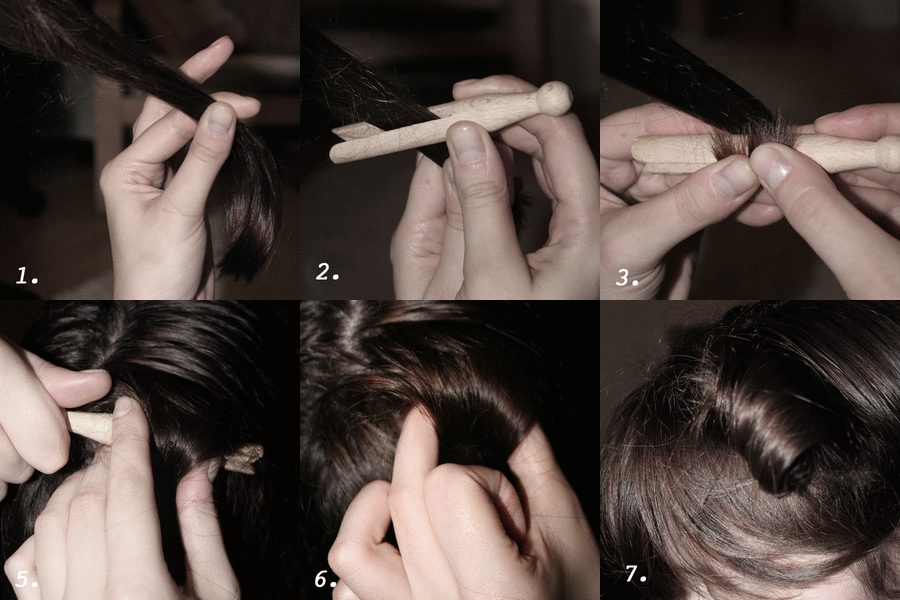
    I am sure most of you will not need any explanation on how to use it as it is super easy - not really any more difficult to use than a normal curler. But incase you do there is a quick tutorial below. I don't claim to be vintage hair blogger, my hair skills are bordering on the non-existent, but I can manage this. It does take a bit longer than I am used to with curlers but I am confident that will change with practice.

    Personally, I think the benefits out weigh the extra time it takes. Being able to curl on damp hair and know it will be dry by morning (applies to lifted curls rather than flat, as the air can still get in to dry them out), which in my case means the curl lasts for days rather than hours. Also, they are very comfortable to sleep in, like resting your head on a fluffy cloud rather than sleeping on a pillow of pebbles.

    ~ DOLLY PEG PIN CURLS ~

    You Will Need:
    Setting Lotion or Mousse
    Comb/Brush
    Dolly Peg 
    Hair Grips (2 per curl) or Pin Curl Clips.
    Note: You might find like I did, that you need to use a nail file to tidy the rough edges of the prongs, this will stop it catching on the hair when you're trying to remove your curl.
    I would avoid conditioning your hair the wash before setting if possible, it makes the hair lovely and silky but a slippery nightmare to pin curl.


    How to make pin curls with a dolly peg 1940's hair tutorial Easy and Cheap pin curl tool

    1. Apply your preferred setting agent to your hair. Take a section of hair, how much depends on you hairs thickness. If doing Lifted pin curls, like me, then make sure the section is no wider than the length of your hair grips, otherwise, it may slide out.

    2. Place the hair through the slot in the peg, slide down to the end of the section

    3. Wrap ends around the peg and under the strand. Roll tightly until you are sure that it is secured. As with curlers, it pays to watch that the ends are tucked in nice and flat to ensure a smoother curl - I find this the trickiest bit!

    4. Slightly more gently roll the peg up to your scalp.

    5. Place your fingers either side of the curl to hold it in place whilst you twist the peg in the opposite direction to loosen the curl and release the peg. Slide the peg out. If the ends of the hair poke out when removing the peg then it's best to re-curl, fighting them back inside generally doesn't work, unless you're doing flat curls.

    6. Stick your fingers in to hold the curl open, whilst you grab your grips/clips.

    7. Pin to secure. Either by twisting so it lies flat to your head or as a raised curl as I have done by using 2 hair grips, one on either side.

    Et Voila! 
    Simple right? Honestly, if I can do it, anyone can!

    My hair is pretty much one length all over so I continued in my usual haphazard fashion all over my head always rolling under. My long - can't decide if I want to grow it or cut it - peekaboo style fringe, is usually a nightmare to get into a curler, so I rolled it into two separate pin curls at the top. 


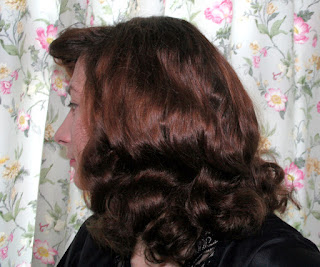
    But after a good nights sleep and a damn good brushing, I think it came out alright. There's still a bit of a 'halo of frizz' my hair is prone to, though much less than with my normal roller set, and my fringe finally looks like it was intentionally curled rather than getting accidentally trapped in a roller! I brushed mine out with a basic cheapo paddle brush, as I have such frizzy hair I find the natural bristle ones create masses of static on my head, making me look like I have been electrocuted!

    How to make pin curls with a dolly peg 1940's hair tutorial Easy and Cheap pin curl tool
    Cringey close up!
    How to make pin curls with a dolly peg 1940's hair tutorial Easy and Cheap pin curl tool
    There is even a semblance of a wave to it ...
    ...if you look hard enough :)
    So there you go, a simple if not very quick, pin curled hair. All done with an easily replaceable tool that cost me all of 9p! A pack of 24 pegs was £1.98 on eBay and with so many pegs left over, I can now relive a bit of my childhood by making some peg dollies with my god daughters...

    ...or just by myself
    Wendy x

    Linking my revelation up to Lakota's Ta-dah! Tuesday

    Sunday, 11 November 2012

    Women In Wartime - MTC Girls For America

    WW2 Women of the MTC
    As it's remembrance Sunday today, I thought it would be appropriate to give you another one of my Picture Posts from the Imperial War Museums archive collection. Today we are going to follow Mrs. Pat Macleod and Miss Winifred Ashford as they go about their daily duties as part of the MTC.

    Before we meet them I think a bit of history about the MTC wouldn't go amiss. I thought I would find loads of information about this service but to my surprise, there is actually very little to be found about the MTC online or in books. I know if it was not for the character of Sam Stewart in Foyle's War (ooh Just learnt there will be a series 8 airing in 2013!!!) many of us, me included would never have heard of them. 


    So first a bit of History... The MTC or to give it is full name the Mechanised Transport Corps, was founded in 1939 by Mrs G.M Cooke CBE as a Women's Uniformed Voluntary Civilian Organisation, it was designed so that women who had family or other existing commitments, could still do their bit for the war effort by driving on a part-time basis.
    Women of the MTC WW2 - Mrs. G Cooke OBE
    Mrs. G.M.Cooke OBE
    Image Taken from the War Relics Forum (Source)
    All recruits underwent a three week intense Recruit's Training Course consisting of:
    Vehicle Maintenance. - 16 hours minimum.
    Map Reading. - 71/2 hours minimum.
    Practical. - Stretcher Drill and Respirator Drill - 4 1/2 hours.
    Special Lectures. - Gas, Driving and Breakdown Procedure, Convoy Driving, Duties of Drivers, Vehicle Inspection, Security.
    Corps Lectures - To acquaint recruits with the administration of the Corps.
    Squad Drill - Two periods daily.
    Driving practice is given when necessary.
    Further training is given, fortnightly or monthly in the unit or company to which the driver is posted. (Quote Source)

    Once trained they would be posted to a unit/company and then be assigned to work as drivers for Several foreign governments, the Ministry of Agriculture, Health, Information and Supply and also for the Anglo-American Ambulance unit. Many also traveled abroad and were drivers in France, Egypt, Palestine, and Syria.

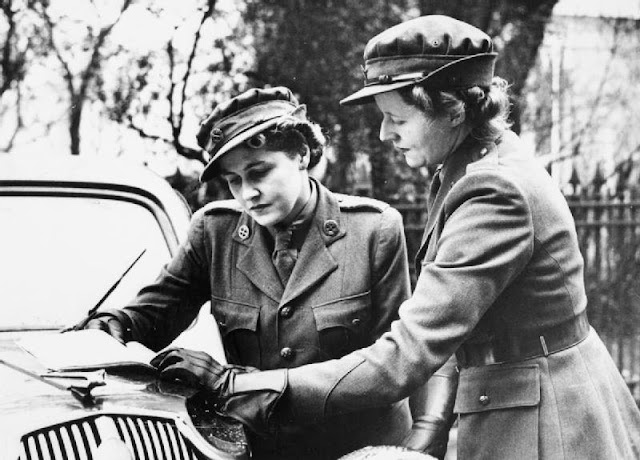
    Women of the MTC - An MTC girl gets her orders from her superior on the bonnet of her car
    Image Taken from the War Relics Forum (Source)
    The most well-known members were the women who volunteered to drive ambulances in France at the beginning of the war as part of Hadfield-Spears Ambulance Unit. The girls who worked for Lady Spears became affectionately known as the "Spearettes".  Their endeavors did not go unnoticed by the French, it is said that the "petulant General de Gaulle peremptorily ordered the Hospital to be disbanded because the crowds at the Paris Victory Parade dared to cheer: 'Vive Spears!'" (Quote Source)

    Unfortunately, there is no record of any girls from the MTC becoming police drivers, but that doesn't mean it couldn't have happened!

    So back to our girls Pat and Winifred. It has taken a little detective work to figure out the story behind today's post . At first glance it would appear that the girls below are American and that's certainly what the archivist thought went typing up the descriptions, in fact, theses two girls are preparing to leave for America to create awareness and support for the people back home by telling their story of life working for the MTC in war-torn London.


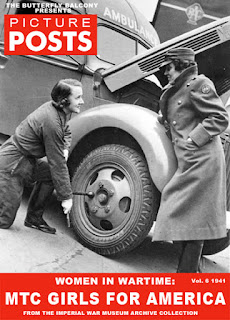
    Women of the MTC - Mrs Pat Macleod tightens a nut on the wheel of her ambulance as Miss Winifred Ashford looks on. The bonnet of the ambulance is open, ready for an inspection of the engine to be carried out. This photograph was probably taken at the depot in Paddington in 1940
    Mrs. Pat Macleod tightens a nut on the wheel of her ambulance as Miss Winifred Ashford looks on. The bonnet of the ambulance is open, ready for an inspection of the engine to be carried out. This photograph was probably taken at the depot in Paddington in 1940.

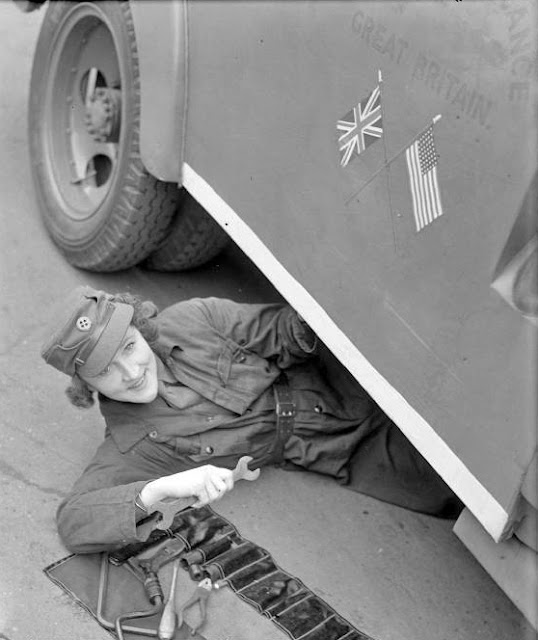
    Women of the WW2 MTC - Mrs Pat Macleod slides out from under the ambulance she is repairing to smile for the camera. She is doing maintenance work on ambulance 8, which was presented by Elliott Nugent Esq. through the American Field Service.
    Mrs. Pat Macleod slides out from under the ambulance she is repairing to smile for the camera. She is doing maintenance work on ambulance 8, which was presented by Elliott Nugent Esq. through the American Field Service.

     The depot is probably somewhere in Paddington in London. Painted on the side of the vehicle are the British and American flags, confirming that this ambulance is part of the American Ambulance, Great Britain.

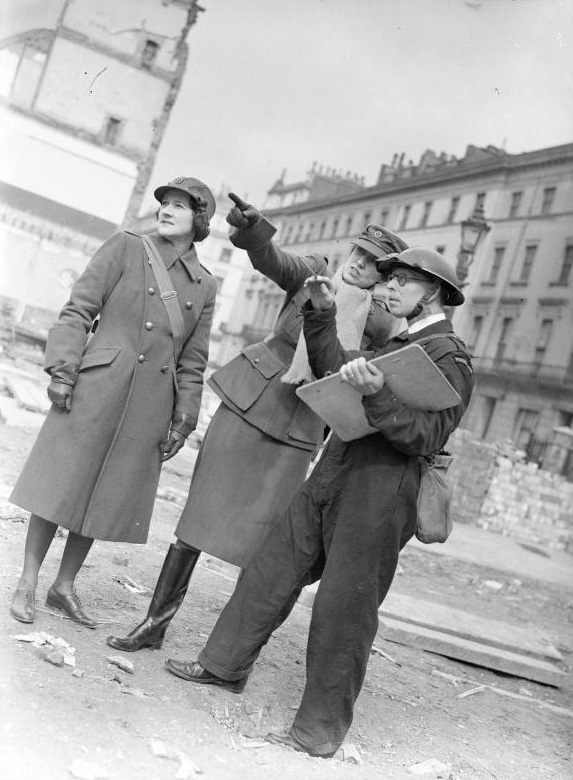
    Women of the WW2 MTC - Miss Winifred Ashford points something out to an Air Raid Precautions (ARP) Warden with a clipboard, as Mrs Pat Macleod looks on. The Warden is based at Paddington ARP station. Behind them can be seen an empty space that once held houses before they were destroyed in an air raid.
    Miss Winifred Ashford points something out to an Air Raid Precautions (ARP) Warden with a clipboard, as Mrs. Pat Macleod looks on. The Warden is based at Paddington ARP station. Behind them can be seen an empty space that once held houses before they were destroyed in an air raid.

    Women of the MTC - Miss Winifred Ashford and Mrs Pat Macleod open up their mobile canteen in front of a pile of rubble and some severely bomb-damaged houses, London, 1940.
    Miss Winifred Ashford and Mrs Pat Macleod open up their mobile canteen in front of a pile of rubble and some severely bomb-damaged houses, London, 1940.

    Women of the WW2 - Miss Winifred Ashford, Mrs Pat Macleod and other women of the MTC join men of the Pioneer Corps as they make toast over a fire built of timbers extracted from the rubble of this bomb-damaged area. This photograph was probably taken on Barrie Street, Paddington and the church which is visible behind the group of people is probably St. James's Church. The car which pulls the mobile canteen run by Miss Ashford and Mrs Macleod is parked outside the church.
    Miss Winifred Ashford, Mrs Pat Macleod and other women of the MTC join men of the Pioneer Corps as they make toast over a fire built of timbers extracted from the rubble of this bomb-damaged area. This photograph was probably taken on Barrie Street, Paddington and the church which is visible behind the group of people is probably St. James's Church. The car which pulls the mobile canteen run by Miss Ashford and Mrs Macleod is parked outside the church.

    Women In Wartime - MTC Girls For America
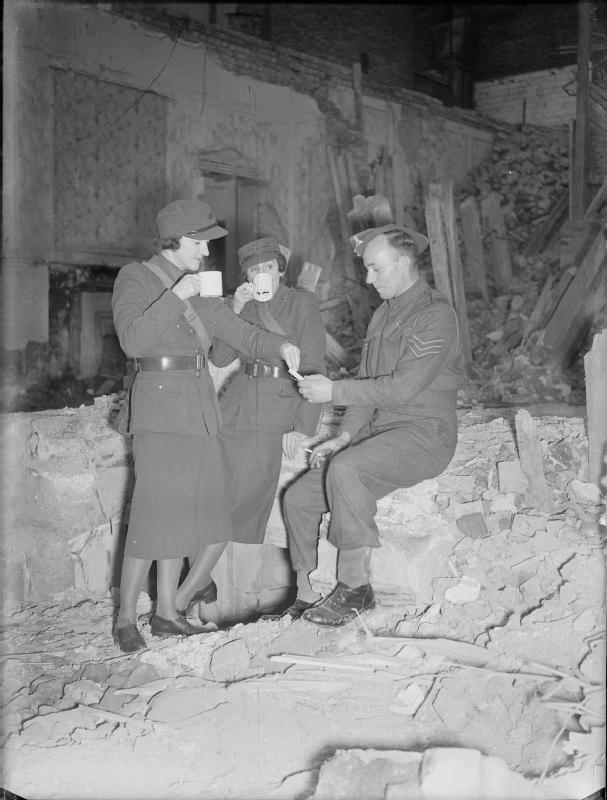
    Mrs Pat Macleod accepts a cigarette from a member of the Pioneer Corps as she and Miss Winifred Ashford enjoy a cup of tea, somewhere in London. They are resting on a large pile of rubble. Behind them, more rubble and timbers can be seen, and also visible is the interior wall of the house which once stood on this site.

    Women of WW2 MTC - Miss Winifred Ashford and Mrs Pat Macleod enjoy a cup of tea beside their mobile canteen amongst rubble and other debris. In the background, St. James's Church, Paddington, can be seen. The spire of the church is shrouded in scaffolding, as it was badly damaged in an air raid.
    Miss Winifred Ashford and Mrs Pat Macleod enjoy a cup of tea beside their mobile canteen amongst rubble and other debris. In the background, St. James's Church, Paddington, can be seen. The spire of the church is shrouded in scaffolding, as it was badly damaged in an air raid.

    Women of the MTC WW2 - Mrs Pat Macleod and Mrs Winifred Ashford chat to a policeman as they wash up in the back of their mobile canteen, somewhere in London, 1940. A church, possibly St James's Church, Paddington, can just be seen in the background.
    Mrs Pat Macleod and Mrs Winifred Ashford chat to a policeman as they wash up in the back of their mobile canteen, somewhere in London, 1940. A church, possibly St James's Church, Paddington, can just be seen in the background.
    Women In Wartime - MTC Girls For America
    Miss Winifred Ashford, Mrs Pat Macleod and a helper from the Pioneer Corps shut up the mobile canteen after supplying refreshments to men of the Pioneer Corps who have been clearing up bomb damage. Behind the canteen, the damaged houses can be clearly seen: three men of the Pioneer Corps can be seen on an upper floor. Also visible are the ARP car which tows the canteen and another car, parked behind the canteen.


    Women In Wartime - MTC Girls For America
    In the rest room at their depot, Miss Winifred Ashford, Mrs Pat Macleod and other members of the Mechanised Transport Corps relax. Seated in front of the fireplace, Miss Ashford reads a newspaper and Mrs Macleod mends an item of clothing whilst their colleagues smoke and play with the depot's kitten. Can you spot the dog?

    Women In Wartime - MTC Girls For America
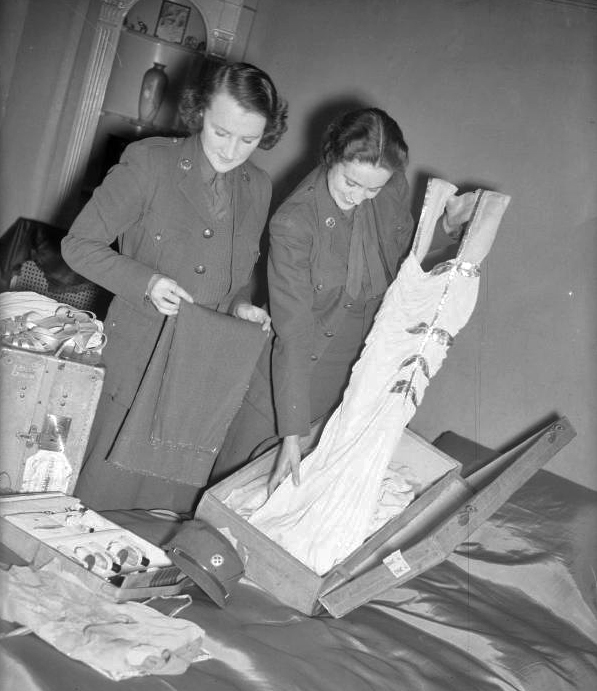
    Mrs Pat Macleod and Miss Winifred Ashford pack their suitcases for departure. It is unclear whether this is their departure from America to Britain, or from a depot to another posting elsewhere in Britain.

    Initially, I struggled to find any information at all on these two ladies - It is always much harder to find the women than the chaps as they tend to get married and change their names. Frustrating! But then I stumbled across some articles on Google's Newspaper database dating from 1941, which I have transcribed below, they offer a fascinating insight into daily life of the MTC.
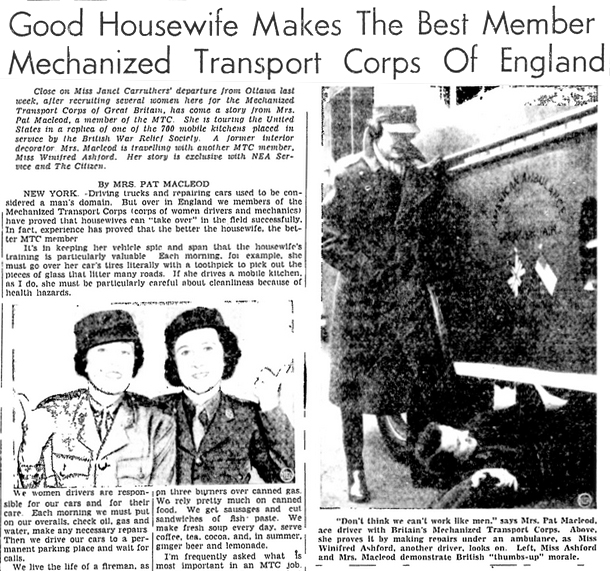
    The first article gives us a bit of background on these two women and explains exactly what they were up to while visiting America.

    Mobile Feeding Unit Here For Tour Of City Today
    Two British Women, Veterans Of Service Under London Bombing, To Demonstrate War Work
    ---Will Show Film.
    Miss Winfred Ashford and Mrs. Pat Macleod, ace drivers of the Mechanized Transport Corps of England, will tour Meriden today with a Mobile feeding Unit similar to that the Meriden chapter of the British war relief society is maintaining in war-torn Britain.

    These women who will give Meriden residents first-hand information concerning their war work will appear in Crown Street Square at 11:30a.m. until 12:30p.m. in front of the NEW Departure plant on Pratt Street at 2:45p.m. in front of factory E, International Silver company, on State Street at 4:45 p.m. and in front of city Hall auditorium at 7:15p.m.

    Film at City Hall
    At 8:15 they will show a sound moving picture taken under the "Blitz" in London "Thumbs Up" in the city Hall auditorium. There will be no charge of any kind and the public is cordially invited.

    Miss Ashford, a dress designer before the war, volunteered for service during the Munich crisis. Her establishment in Bond street, London was bombed out during the "Blitz" she has done night duty without a break since the outbreak of war in the greatly bombed dock area of London.

    Mrs. Macleod comes from Dover, England. Before the war she travelled widely and has done big game shooting in the Kalahari Desert. She has frequently fed as many as 300 people in a night when she had been on duty with the Mobile Feeding Unit and has done fire duty as well.

    Both these women have survived the worst of London's bombing, exhibiting great bravery and cool heads in the midst of violent action.

    The second article which can be found in a few publications has been written by Pat Macleod, Now it is quite long but it gives us a great insight into exactly what these women were facing on a daily basis.

    'Good Housewife Makes the Best Member Of The Mechanised Transport Corps Of England'
    By Mrs Pat Macleod
    NEW YORK - Driving trucks and repairing cars used to be considered a man's domain. But over in England we members of the Mechanized Transport Corps (a corps of women drivers and mechanics) have proved that the better the housewife, the better MTC member. 
    It's in keeping her vehicle spick and span that the housewife's training is particularly valuable. Each morning for example, she must go over her car's tires literally with a tooth pick to pick out the pieces of glass that litter many roads. If she drives a mobile kitchen, as I do, she must be particularly careful about cleanliness because of health hazards. 
    We women drivers are responsible for our care and for their care. Each morning we must put on our overalls, check oil, gas and water, make any necessary repairs. Then we drive our car to a permanent parking place and wait for calls. 
    We live the life of a fireman as far as hours are concerned - often working 12 to 24 hours straight. Once I did 36 hours at a stretch during the big London fire in December. And during the period when we are working, we are constantly on call. Its hard work - tough work. With hours that sometimes seem like days. There's no gainsaying that But by this time everyone knows that Englishwomen can take it. It was easier for me than for some others perhaps, because I had volunteered at the French Military Hospital in Biarritz during the last war and had seen six months service as an ambulance driver. 
    EACH CALL IS AN 'INCIDENT'
    When this war began I enlisted in the MTC and since have driven almost every kind of wartime vehicle under almost every circumstance and condition. Now with the mobile kitchen unit, I go about feeding thousands who pack shelters, those who lie wounded in air raid ruins or those who keep on bravely living in the skeletons of dwellings they call homes.
    The car we use is a three piece trailer affair - a sedan pulling two trailers. The vehicle as a whole weighs three tons.
     
    I have an assistant - a paid air-raid precautions worker, and a district to cover - Paddington allied with military objectives such as gas works railroad terminals, power stations, ammunition dumps.
    Each call we make is called an 'incident' which seems to amuse Americans. An 'Incident' is undertaken usually about a half hour after the raid call sounds. The depot department may report: "Causalities are heavy - better take enough for 400 people". I drive to a place where most people are likely to be gathered - frequently under direct bombing attack. 
    Then when the shrapnel has ceased beating a tune on my tin hat, I set up shop. Queues form, and I serve food. It's wholesome food, but nothing elaborate, for we cook on three burners over canned gas. We rely pretty much on canned food. We get sausages and cut sandwiches of fish paste. We make fresh soup every day, serve coffee, tea, cocoa and in summer gingerbread and lemonade. 
    MAPS ARE VITAL I'm frequently asked what is most important in an MTC job. In my opinion it's maps - just plain everyday street maps - and that surprises most people. But consider when the call comes in the dead of night and you set out for a given destination, all is pitch dark. The black out is on. You cannot see your streets and alleys. you must know them. You must have memorised each landmark and remember where the bombs have fallen and the streets are filled with great holes. And that is nor enough - you must have the last minute word on this. Even as you leave, a shell hole may have appeared on a new place and you drive in to certain destruction unless last minute checks are made by phone and radio. Sometimes your travels become circuitous. But in your first training, maps are fairly banged into your head. MTC members undergo a very strenuous three-week training course during which you learn map reading, car maintenance, convoy driving, first-aid, gas precaution and drill for two hours every day. 
    Someone usually asks me: Can the women stand it? Can they and how, as Americans say. More than ninety percent of the London women can take it and fit in to some picture or other: just as we MTC members have fitted into our jobs somehow, you begin to forget danger, just want to get where your going and help. Bravery is probably catching. when you see bombed babies, when you view the blast remains of historic landmarks your people have been proud of for centuries past, it's easy to take repairing a car with grease on your hands and in your hair. British women can take it, as the members of the MTC prove. We have been called brave - if we are, it's because we have caught it, from the staunch, heroic citizenry we serve.
    I think you'll agree the girls of the MTC were very courageous women, especially considering during much of the war (until the Ministry of War Transport eventually recognised it) they were volunteers who received no pay. As little can be found online about the women of the MTC, I hope this post will go away to help them not be forgotten.


    If you enjoyed this post you can read more about women of the MTC below, or if you fancy looking through some my past Picture Posts click the tab at the top!

    Further Reading:
    Wendy x

    Friday, 26 October 2012

    Better Late Than Never!

    Not only am I an unreliable blogger, I am a unreliable daughter too.

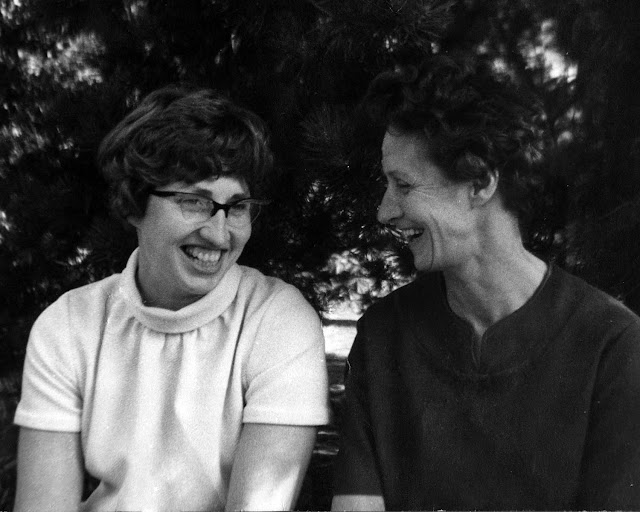
    Yesterday was my Mums birthday and I totally forgot. To be fair I thought today was the 25th not yesterday, but that's no excuse especially in the days of smartphones with alarm reminders. It is so bad that she had to ring me early this morning to see if I was alright. So I've not only forgotten to say Happy Birthday but also made her worry! *hangs head in shame*

    Joyce Bayford
    I love this picture so much, it has really captured a sweet moment between them, and have you spotted my Mums fabulous glasses!!! 
    Luckily I am popping down to see my parents this weekend, so at least I can apologise in person, armed with a big box of chocolates, but I thought as an extra apology I'd share my favourite picture of my mum and grandma (more on my grandma in the next post), taken by my keen photographer Granddad in the 60s.
    Happy Birthday Mum!
    Wendy x

    Wednesday, 24 October 2012

    Things To Make & Do - Winter Coat

    It's certainly getting chillier around these parts and that has reminded me that I to get a good winter coat sorted as soon as possible. I have spent so many years now trying to find the perfect coat, and so far nothing has hit the spot, so as I do every year I turned to the good old interweb, for inspiration.

    Well rather than just looking for inspiration, I got a bit carried away and spent some of my money on some bits from Etsy (so much more civilised than the old Bay of e) I shall duly be showing them all off over the next few weeks (weather permitting, they are quite summery), but as it's coats I'm talking about today, I wanted to introduce you to my favourite purchase of the lot.
      
    The lady who originally owned it bought it in 1947 she only got to wear it a few times, before having children and so it's been in storage ever since.
    I absolutely fell in love with it the moment I saw it and the fact that it might actually fit was too much for me to resist. I am not normally one for buying 'real' vintage items from this era, but it was so so lovely I knew I would regret not buying it!

    It came from the very lovely Vintage Chrissy on Etsy who has some seriously gorgeous items in stock- I also bought a beautiful 60's dress which I am saving to show off at Christmas, it's very fancy and totally a Sunday Best contender!
    I just love the drape of the pockets and the woven buttons
    Anyhow, as lovely as this coat is it's not going to be warm enough for bus stop waiting in depths of winter and far too precious a thing to wear every day. So I have decided that 2012 is the year that I finally get around to making myself that perfect vintage coat I've been dreaming about for soo long. As it turns out I could not have picked a better time to try, as there are two contenders, both from Butterick which I think would do the job wonderfully.

    The first pattern is Butterick 5425 a modern pattern with a 1940s flair!
    Butterick 5425
    In the shorter length, with the collars as on the white version, it's looking very 1940s to me!
    It has the classic princess seam of all good 1940s coats, shoulder pads, slightly puffed sleeves (boy do I love a puffed sleeve) and the classic 'Fit n Flare' shape (nipped in waist and fuller skirt) which is what draws me to these styles in the first place, elegant and practical, warm but yet fitted.

    The day after I bought my 5425 pattern, the fabulous Gertie announced a sew-along on her newest Butterick pattern, this gorgeous 1950s creation.


    Butterick 5824
    I want one in blue, red, black...
    It's based on the Princess coats of the 50s and again it has the 'Fit n Flare' shape but with a much fuller bias cut skirt, a large draping collar and wonderfully roomy 'batwing' style sleeves, which are cut in one piece with the bodice, so no pesky sleeve fitting. Ingenious!

    "Ooh count me in" I replied no one can have too many coats! So I set about finding the right fabric for these dream patterns and this is where I have hit a hurdle. I have really struggled to find suitable wool fabric online or in the shops. I have no problem spending a fair amount on good quality fabric (well I do, but for a staple like a coat I can justify it, sort of) but the colours are quite dull and unless I order a swatch I have no way of knowing that my £19.00 p/m is going to be worth it, oh and did I mention both these coats need about seven meters each! Eeek!

    So anyway after my, what seems like fiftieth eBay search, and out of desperation, I decided to work on the Gertie coat first and use this fabric.


    It's a short pile fur fabric which, from a distance looks like Astrakhan (a very 50s coat fabric) and is medium in weight £5.99 p/m.

    As of last night, I have cut out all my outer fabric (my word the fluff gets everywhere) and I am patiently awaiting the arrival of my lining and interfacing before cracking on with the next step. I'm really hoping it will look great, though I have been getting pangs of terror every now and then, as I am aware that it could be an utter furry disaster, but whatever it looks like it's certainly going to be warm. I guess we'll just have to wait and see!

    Wendy x

    Wednesday, 10 October 2012

    Knit It - A Parliament of Sleepy Owls

    No, I have not gone all political on you with a comment on the state of our current government (though it would be apt) it is, in fact, my latest finished knitting project - Parliament is the collective term for a group of Owls, odd isn't it. I suppose it refers to the wisdom both 'creatures' are supposed to possess!

    With today's project complete, it means I have gifts for Christmas ready in October! 
    I confess to feeling a little smug at the moment, as this is unheard of and seriously out of character. So to mark this achievement (although it's a day late) I am linking up to Lakota's Tada! Tuesday. Have you signed up for her Christmas swap yet? Click the link on the side bar. Don't be shy it's honestly a lot of fun and you'll have the perfect excuse for even more charity shop rummaging!

    Never fear I won't be wallowing in my achievement for too long, as I have recently committed myself to knitting my Dad a Fair Isle Pullover, from Tupneys pattern, oh and did I mention I haaaate knitting Fair Isle, one way or another I'm sure there will be plenty of last minute present related stress to enjoy!
    Anyway back to the owls!

    ~ Sleepy Owl Cushions ~


    Designed By: Knitting Pony
    Free Pattern Here: Sleepy Owl Cushion
    Ingredients:
    • Chunky or Bulky Yarn
    • 6.5mm Knitting Needles 
    • Contrast Yarn Embroidery (eyes and beak)
    • 4ply yarn Various colours (Feathers)
    • 3.5mm crochet hook (Feathers)
    • Stuffing
    • Yarn needle
    Youtube-ular Know How:
    * If you can get this technique down, you will never use a chained circle to start your project again! This is so much easier especially for beginners, as you can make the required stitches in lots of space and then pull it all together nice and neat at the end. Marvelous!

    I saw this tutorial over at Knitting Pony's blog last year, I knew as soon as I could find the right yarn I would have to make one for each of my friends little ones. I feel like I say this every post but, these are really easy to make! They are knitted on big needles with chunky wool, so knit up really quick which makes it almost feels like cheating!


    For my owls I used 3 balls of  James C Brett Marble Chunky in brown 16, which I think has worked really well and it's lovely and soft, and definitely huggable! I went down a size on the needles to 6mm as the stitches were a bit too loose, looking at them now they are finished I could easily have gone down another size as you can still see the stuffing in places.

    As I had 7 children (2 families with 3 Children, and 1 family with 1 child) to knit an owl for, I decided so as there was a bit of variety I would do one normal size (34st), one medium size (29sts), and one small size (24sts), to match the children’s ages biggest for the oldest child etc.


    Rather than using just 4ply, I chose to use the chunky wool for the majority of the crocheted owl feathers. I made the smaller feathers simply by doing fewer rows/rounds, which I think worked quite well. I found the hardest bit of the whole process was stitching in the face, I ended up by couching the thread as all my other attempts came out rather wonky.


    So from 3 balls of yarn I have knitted 3 large, 2 medium and 2 small owls, including feathers which is not bad going especially as I even have some left over perhaps for a small owl for me! Though I think I'd better put all thoughts of that aside for now and get cracking on that Fair Isle pullover!

    Wendy x