Showing posts with label Embroidery. Show all posts

Tuesday, 31 July 2012

Things to Make & Do - UFO's & Stash Busting

Hello, my lovelies!  A rubbish blogger that I am, I thought it was about time I popped by and showed you the bit of UFO & Stash Busting I have been doing in June & July.

To be honest there has not been that much, two projects to be precise. Most of what I have made has been for others (I know I am selfless), and shockingly I've even started knitting for Christmas, which is wholly unlike me! So a separate post will surely follow with all those goodies...but for now back to the busting

Candy Cane Beach Bra
(UFO & Stash Buster)

I bought this pattern early last year as I wanted to make it up for my summer hols but I never got around to doing more than cutting it out from the fabric, I am lazy!


Created By: Mrs Depew Vintage

Ingredients: 

  • Approx. 0.5 yard Cotton Outer
  • Approx. 0.5 yard Cotton Lining
  •  2 Buttons

There is not really much to say about this pattern as it was very simple and straightforward to make up, just 6 pieces (including the lining) so I really can't think why I took so long to finish it!


I absolutely love the 50's pointed collar on this top
Both the outer & lining (plain white cotton) fabrics were from Walthamstow market at £1 a meter and have been sitting in my stash for a few years, I found the candy stripe quite a little irritating to work with as it refused to match up (see the front seam) but that probably has more to do with me than the fabric!


I used two massive buttons on the back to make it a bit easier to open/close without asking for assistance and to ensure it doesn't suddenly ping open in public. I think I will have to have a go at making up a matching pair of shorts then all I'll need is some sunshine and a sandy beach!


Crewel Love
(UFO & Stash Buster)

I started this embroidery shortly after I finished my crewel embroidery kit back in February I had gone crazy pinning embroidery pictures and was keen to get stuck into something a bit more difficult.

My inspiration came from this 70s 'God Bless Our Pad' I loved it so much I knew I had to try my own take on it.


Source: racheldenbow.blogspot.com via Wendy on Pinterest

Not being the most religious of souls, I felt it would be more appropriate to have a different phrase and eventually I settled on The Beatles lyric 'Love is All You Need' which I think is in keeping with the flower power theme.


Pattern Here: Love is All You Need

Know How:  Split Stitch
                      Padded Satin Stitch
                      French Knot

Ingredients: 
  • 20" x 16" Frame without glass
  • 24" x 20" woven fabric 
  • Odds and ends of yarn
  • Embroidery Hoop or Frame

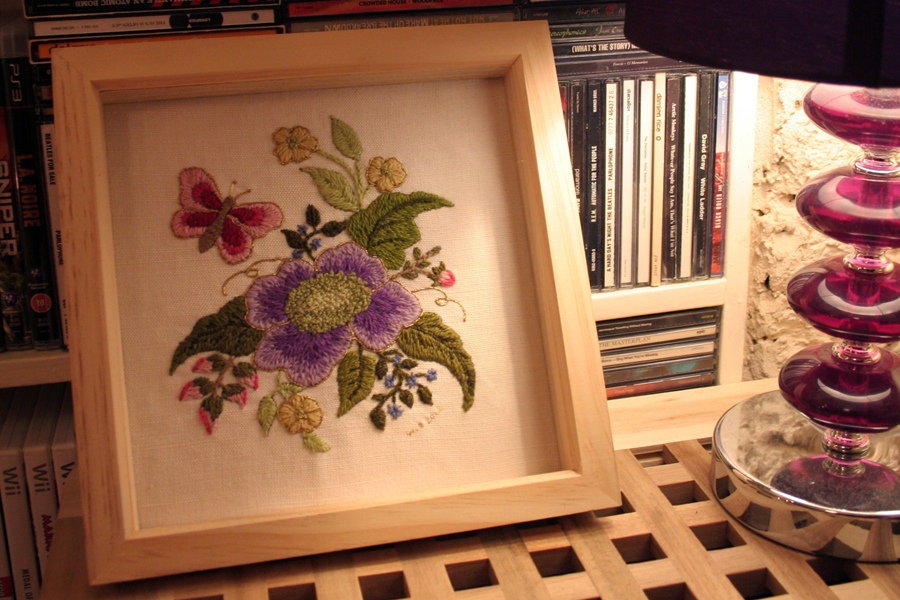
I've had the frame for years, I saved it from the bin (classy) back when I worked in a photo lab, the glass was missing so it could no longer be sold, but I knew that it would come in handy for something and at last it has.

The backing fabric was taken from a pair of Next curtains a college at work kindly gave to me as they were redecorating and though I could use them, unfortunately, they didn't fit any of our windows, so after much deliberating I decided to re-purpose them as they were the perfect colour and weave for a bit of embroidering.

I first outlined each letter in split stitch, then I used a huge Padded Satin Stitch to fill them in.


I traced my text onto the fabric using a pencil, which I soon learned was a mistake. The white wool was gradually turning grey as I stitched over the outlines, eeek!  Fortunately, I can report after washing it has pretty much gone, phew! Next time I will be using a water soluble pen much less stressful!


Making the most of stitching in the sunshine.
I bought myself a cheap tapestry frame from Hobbycraft as the hoop was just not big enough.
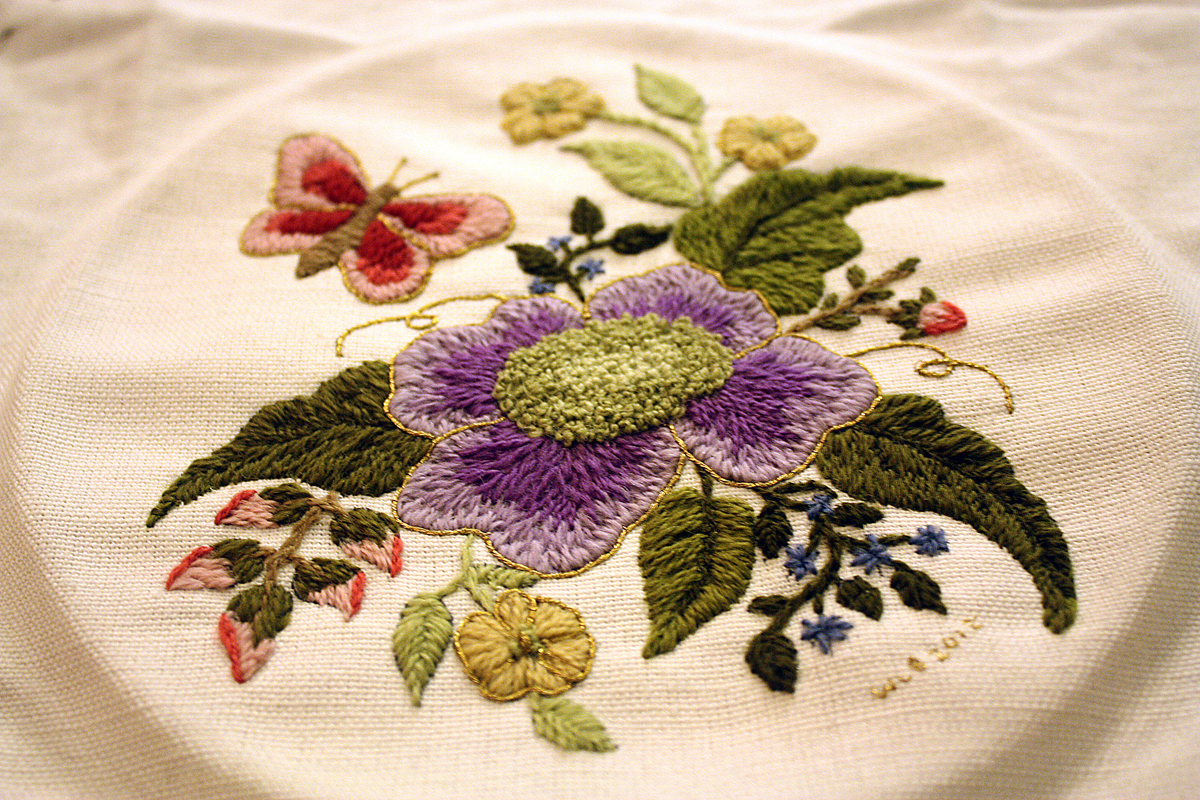
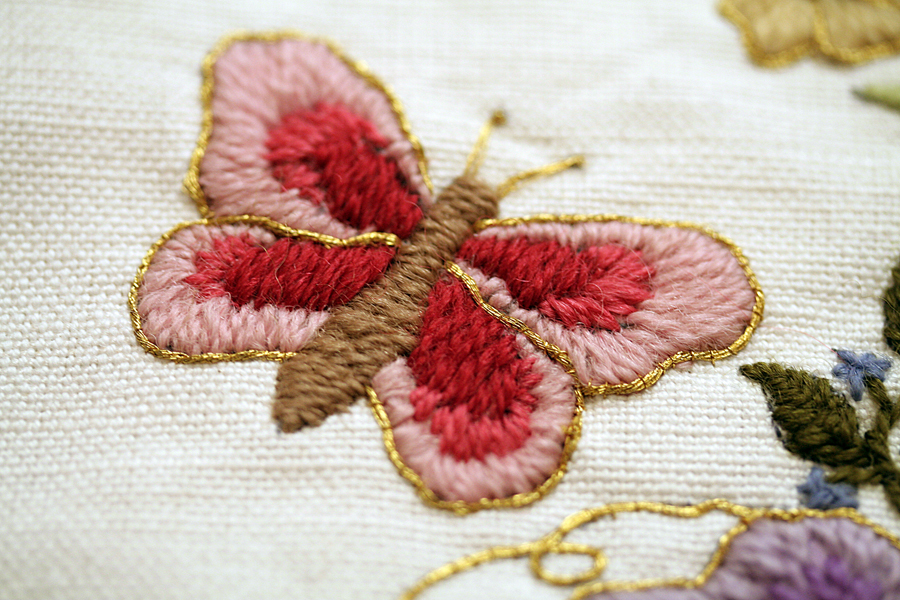
 I improvised the flowers as my embroidery skills are still rather limited I stuck to what I knew  (3 stitches) and kept it simple, but no less effective I think! If I were to make another I would definitely mark out the flowers beforehand as I did struggle to fill some gaps and not have too many of the same colour too close together.


I actually finished the last few flowers whilst watching the amazing Olympic opening ceremony, in between bouts of lump in the throat sobbing that is - what the heck! I had no idea I felt so patriotic - the boyfriend though I was having a breakdown - all I can say is thank goodness for Rowan Atkinson irreverent silliness, making me laugh myself out of it!


It needs a bit of a gentle press to reduce some of the creases caused by washing, and I may add a few more flowers at a later date. But all in all, I think it looks great and well worth the many, many hours it has taken to finish, as I really enjoyed each and everyone, especially those sat in the sunshine!

Oh, and as it's Tuesday I am going to link up to Lakota's Ta-da! Tuesday!!

Wendy x

Monday, 13 February 2012

Things to Make & Do - Valentines Gifts for Boys

Well hello, I hope you all have had wonderful weekends! Mine was spent in full crafting mode and I have managed to tick off a few more things off my to-do list, which is always a good feeling!

The first thing I ticked off my list was something for valentines day. Now I must be honest I'm not usually a huge fan of Valentines day (if valentines has a grinch...it's me! Read Miss Marie's post it sums up my feelings exactly) but I thought this year I would put some effort in and craft something nice for the Boyfriend as he at least is quite keen on upholding the tradition.

I soon realised that it's a bit more tricky than I had first thought. It is all very well for us crafty lasses to go all mushy over mugs with hearts on, silly on stuffed teddy's, and gooey over glittery jewellery (yes please!), but at the end of the day many of us are wanting to give our crafty creations to the one(s) we love, and they are not always going to be keen on receiving a shabby chic fluffy bunny covered in love hearts...even if you have spent the last three weeks crafting into the night to make it!


So I decided I was going to have to try and put my creativity into something he won't be totally embarrassed to own, and since my embroidery obsession is still in full swing I thought I would make the most of it and create a very simple and quick solution to the problem with...


Em-Boy-dery
(Sorry I couldn't help myself:))


Ingredients:  Scrap of Fabric
                      Embroidery hoop
                      Scraps of Wool or Embroidery Thread
                      Large eyed sharp embroidery needle
                      Pencil or Wash-out-able Fabric pen

Free Pattern: Click below images to make larger (sized to UK A4)
All of the above fonts (apart from my hand drawn one) are free to download from various websites, (just google the name) so you can change the text to anything you like!

Know How: Embroidery Stitches, Split stitch and Satin Stitch 

I searched the web for some manly looking fonts, well to be honest anything, nerdy, sci-fi, I.T. or Tattoo styled, I knew would fit the bill. In the end, I opted for a very quickly sketched block style font which I thought would be the quickest to do (had to get it done while he was out!)
I drew out my desired pattern onto a piece of paper to the size I wanted, blue-tacked it to a window and quickly traced it onto my fabric using a wash-out-able fabric pen, you could use a soft pencil too, but if you are using light colours then it is best to avoid as the graphite will stain the thread.
I popped my fabric into an embroidery hoop and then using white wool, I Split Stitched all around the edges of the letters and then with a long Satin Stitch I filled in the shading!
I kept mine really simple by just using white as I know anything frilly or wildly colourful tends to leave my boyfriend cowering behind his computer screen in fear. And even if he does turn his nose up at it, I think it is pretty cool, it took only a few of my precious crafting hours and it will look really cute on the book shelf!


Some Fabulously Creative Valentine Tutorials:
Have a great Monday!
Wendy x

Monday, 6 February 2012

Things To Make & Do - Crewel Embroidery

Morning, I hope you all had wonderful weekends & if you're in the UK that you had lots of fun playing in the snow! Not so much fun this morning though but still, it makes walking to work a bit more interesting, to say the least, even if does mean occasionally slipping landing on your behind in front of a bunch of giggling teenagers!

Well on to my third project on my to-do list and one I never thought I would compete as I really didn't think I had the patience, but I was wrong as I have become totally addicted to embroidery!


It has been years since I have done any kind of embroidery, that was cross stitch and I was bad at it. To be fair it was probably down to my laziness, I found it to be frank a bit dull, the easy pictures were twee, and the ones I liked were difficult to do and required hours before they resembled anything at all (I did I mention my attention span) and the counting of squares and marking out always terrified me into giving up after a few frustrated hours. I think you need to have a bit of a mathematical mind, which I don't, so I never found the joy in it that my Mum and Aunties could so I decided that embroidery was just not for me.
 
Satin Stitch butterfly with gold couched thread.
After receiving a crewel embroidery kit from the fabulous Shirl in the Pre-Christmas swap, I thought I would give it a go. Crewel embroidery though is soo different and I honestly think I am in love! I started into the kit with a little trepidation, honestly believing I would be adding this to the long list of UFOs...but no...once I had done my first few stitches I was hooked, time flew by, boyfriend paced anxiously waiting for his tea, while I was absorbed in my world of stitchery.
I love the fact that you can be a bit more freehand than with cross stitch, you can make it as individual as you like and mistakes can be worked with and around much more easily...I totally got the greens muddled up when doing the leaves but I doubt anyone but me would spot that!
Within a few days, I was done and gazing at my first finished embroidery! I had learnt a new skill and I had a cute quaint woolly masterpiece! result!
 
I have mounted it in a box frame so the stitches didn't get squashed and I think it looks a treat! It's not the greatest example of embroidering skills I grant you, but it has given me the confidence to tackle something a bit more difficult!

Wendy x