Showing posts with label Things to Make and Do. Show all posts

Sunday, 7 February 2016

Crochet It - Stained Glass Blanket

Hello, I hope 2016 is being kind to you!
Today I want to introduce you to my first finished project of 2016, it's been a long time in the making so I am very, very glad that I can finally call it finished!

~ Stained Glass Granny Square Blanket ~
Stash Buster & UFO

I first blogged about this project back in 2013, as part of my UFO Hall of Shame, but that's not when I started this project it was actually way back in 2011 that this project first came to life!

The Butterfly Balcony - Stained Glass Granny Square Afghan Blanket Pattern


 Pattern: None I winged it! 
Essentially 24 Granny squares joined and then bordered with rows of granny square shells 
(two double crochet stitches then a single chain - triple chain on corners) 
until the desired size is reached then a scalloped edging is added.
Ingredients:
3mm Crochet Hook
Lots of yarn in various thicknesses
Stitches Used:
Puff Stitch // Granny Square // Scalloped edge
Joining Granny Square

It began as a way for me to relax whilst living amongst the boxes shortly after moving home. There was no TV or internet access for about a month and so in the few minutes each day, after reorganising boxes, cooking dinner and falling asleep on the uncomfortable (all we had) dining chairs, I did a little crochet!

The Butterfly Balcony - Stained Glass Granny Square Afghan Blanket Pattern

Now you might not notice it from the finished object, as it is a little different, but my inspiration actually came from, one of my favourite TV shows, The Big Bang Theory. Amy Farrah Fowler has a lovely Granny Square afghan on her couch which is all edged in black and it seemed like the most suitable project for using all the granny squares I had made!

Sonja Flemming/CBS ©2012 CBS Broadcasting, Inc.
( Image Source and Pattern from the Geek Mom blog )

It's worth noting (probably because I didn't have the internet to hand) that rather than doing a double/treble crochet stitch shell typical of the granny square, I mistakenly did a puff stitch square instead. I can only think to blame muscle memory, as the last thing I had turned out with a crochet hook was my puff stitch beret so my hands just naturally resorted back to this stitch! My mistake was realised only once I began joining the squares together, and though it's not a massive problem the reason a  puff stitch suits beret making is the fact it creates a slightly domed rather than a flat fabric and so my little granny squares have created more of a lumpy (or as I have been referring to it nippily) fabric than I had desired, but heck it's just as cozy!

The Butterfly Balcony - Stained Glass Granny Square Afghan Blanket Pattern

After crocheting 24 squares I got a bit bored and so decided to just get cracking and start joining them together (which I did 2 New Years Eves ago). I then to make the blanket a more useful size I decided to encompass the squares with rows of double crochet, mostly using black but occasionally adding a couple of rows of one of the colourful yarns from the centre, I think it's worked out quite well it's certainly striking and the border thankfully has certainly helped to flatten down the puffy squares a little.

The Butterfly Balcony - Stained Glass Granny Square Afghan Blanket Pattern

And that was how it was left for 2 more years (I don't like to rush anything!). It was only on New Years day, this year that I finally added my last few rows of black to the border and then added the pink scalloped edging, which is something my mum showed me how to do and I must say finally makes me feel like I might have a hope of getting better at this crochet malarkey!

The Butterfly Balcony - Stained Glass Granny Square Afghan Blanket Pattern

Now it's finally finished I am rather in love with it, I just adore how striking it is it and it's certainly helped brighten up a rather dull beige sofa! In hindsight I wish I had made it just a little bigger, so that I could swathe myself in it on chilly evenings, but it fits the sofa nicely and keeps my knees warm while watching TV and plotting my next project, and lets face it seeing as it's taken me five years to get this far I think I should count my blessings that it even covers my knees!

Wendy x

Monday, 15 September 2014

Sew it - Girls Gathered Skirt Tutorial

A little friend of mine, Keira, who turned 5 a matter of days ago, saw my crazy cat dirndl skirt and fell in love, well you can't blame her! As a cat lady in training herself (she has 'adopted' a scruffy black cat who lives down her street called Rosie, they are now the best of buddies, aah!) I decided as I had a little fabric leftover from my version I really ought to make her a skirt of her own, so that we could be crazy cat ladies together!

~ Girls Gathered Skirt ~
This skirt is as easy as pie to make, there is no need for a pattern just ready your tape measure, and in about an hour you'll have a skirt fit for a princess!


Ingredients:
20" (51 cm) of 2/8" (7cm) Wide Elastic 
About 1/2 yard 45" wide Cotton/Polycotton Fabric
Matching Thread
Sewing Machine & Pins
Tape Measure & Scissors
Elastic threading needle or Safety Pin
Iron & Ironing board

Measure & Cut: 
Waist measurement x 2 = Width
I followed the similar principles to making the adult dirndl version, this will make the skirt nice and full, but as children don't have hips to contend with you could easily add less, it all depends on how much gathering you want and how much fabric you have! 

Waist to Hem + 5 inch = Length
To get the length measurement simple measure from the child's waist to where you want the skirt to fall, above/below the knee, and then add 5 inches to this measurement, that will give you plenty of fabric for the waistband and hem.

Sew It: 


1. Measure out and cut your fabric to size as described above, then zigzag or overlock/serge all of the raw edges of your fabric.


2. Fold the length of fabric together right sides of the fabric touching and sew the side seam within the 5/8th" seam allowance. Using a cool iron (if using polycotton or anything that might melt) open out the new seam and press it gently flat.


3. On the top edge of the hoop of fabric you have created, fold the fabric over twice to enclose the raw edges and to create a tunnel for the elastic this will be your waistband, pin in place as you go round.


4. Zigzag stitch around to secure removing the pins as you go. Start your stitching just past the first seam you created and ending a little before, this will give you a nice little neat gap to thread your gathering elastic through.


5. Thread an elastic needle or safety pin with 0.5cm wide elastic and thread through the hole in the waistband. Work the elastic around the waistband until you have returned to the beginning.


6. Once out the other side, gather the skirt to the required width, ensuring there is enough stretch still left in the elastic for the comfort of wear and ease of getting it on and off! Knot the elastic securely and tuck up into the waistband.


7. You will need to check whereabouts on the leg you want the bottom of the skirt to fall before pinning the hem. This will determine how much of the lower edge you will need to turn over to reach this measurement. 


8. Once you have found your measurement, hem the bottom of the skirt in the same way as you created the waistband, turn the skirt inside out and double fold the raw edges under. The only difference is, this time, leave no gap!!


9. You can either sew the hem with a zigzag stitch as the waistband or if you prefer a  simple straight stitch will do the job just as well.


10. Lastly, give the hem a quick press with your iron (same temp as above) and you are done!

Kiera's skirt was fashioned from a leftover fabric panel which was 44" (112cm)  x 17" (44cm).  I had to guess Keira's measurements as I didn't want to spoil the surprise, luckily I was not too far off, as you will see in the top picture it is a little bit big and I could have easily added less fabric to the width (waistband) of the skirt to make it a little less 'poofy', but if nothing else it will give her room to grow as the elastic can easily be let out when needed, so it should last her a few months at least! I also love the fact that this pattern could easily be scaled up to fit adult measurements, though it would be wise to use a thicker gauge elastic to avoid the waistband from digging in!

By all accounts, Keira seems to love her kitty skirt and on being given it choose to wear it straight away over the skirt she already had on!

A Success I'd Say!

Wendy x

Friday, 12 September 2014

Sew It - A Dirndl A Day

Not very long after I moved from my room in Walthamstow to a flat in Woodford, I made a skirt, this skirt to be precise!


I blogged about this skirt (here) and thought this skirt was lovely, so pretty, so colorful and so quick to make. But to my shame I've never once wore it. Oh, I tried it on a few times but always decided and that it made my hips & behind look huuuuge and so stuck it back in my wardrobe and pretended it never existed.

That was until a few weeks ago, I don't have much wardrobe space so I decided it was time to be ruthless, if it didn't fit (waiting for that mythical 'thinner me') or hadn't been worn in ages, it was time to say goodbye. So when I got to this skirt, I knew it was time either to wear it or re-uses the beautiful fabric.


I tried it on and strangely my previous concerns didn't bother me quite as much, I could see past the big-buttedness and knew that this pretty skirt would be perfect for surviving the heatwave we were having. And now that I don't give (so much of) a damn how big my butt looks I have been wearing this skirt to death, it actually got to the point were I was sad that it had to go in the wash, this made me aware of two things:
  1. I am a fickle sod. I'm the same size as when I made this so my derrière must look the same!
  2. I was going to need more of these skirts and quickly to give me a chance to wear them before the good weather here in the UK disappears once and for all!
So I have made some more, well quite a few more, I now have six skirts, that's very nearly one for every day of the week!

All of these skirts have taken just under 2 meters of fabric to make and with the exception of the black one came from Minerva Crafts and cost £2.99 pm.  As before I followed Gertie's Dirndl Skirt Tutorial (Part One & Part Two) I did make a few changes to the pattern. Rather than using the measurements Gertie suggest I came up with my own, due to my hip to waist ratio I wanted less fabric in the skirt so I decided to just double my waist measurement which gave me a nice full skirt but not too full. Also I didn't make a paper pattern for either my skirt or waistband, as once you have worked out correct measurement the pieces, being cotton the fabric can be easily sniped & ripped to the required size, for me not having much space for laying out fabric to pin a pattern to, it really is a huge help!

Right, on to the skirts!


Just looking at this fabric makes me happy, its full of summer sunshine and one of my favourite colours and as far as I can remember this will be the first time I have ever worn yellow!


For some reason making this skirt was more difficult than the others, due to a zip that would not behave, I think it might be that this fabric was just a little lighter in weight than the others but now that I have stitched it into submission, I am so glad I persevered as its so lovely!


This was the most worn, so far, out of all of the new skirts I've made. I really love the way the pinks and dark blue contrast and luckily despite bringing more pink into my wardrobe ( I really thought I hated pink, must be in denial) it goes well with most of the tops I already own, hence why its being worn and worn!


The Fabric was from Minerva Crafts and is still available Navy/Pink Floral Print As much as I love this skirt it is the one where the fabric has not held up to general wear as sadly the colour is fading a little more with each wash but it still looks presentable.

Yes this skirt is covered in yellow Donkeys and Blue Zebras and I love it. Enough said!


This Fabric is Donkey Fabric from Minerva Crafts and I love it! It is totally wacky and kitsch and so to my mind echoes Some of the fabulously Kitsch skirts of the 50's.

As a teen I was never really a goth more of a brit pop tom boy, but my oh my I did wear a lot of black (and by a lot I really mean almost everything) all of the other skirts would have made me sick with fear! It has taken me years to fight back my black compulsion, I'm drawn to it.


So to appease the voice in my head which is always screaming 'make it in black' I made this skirt, it also acts to balance out all the floral funkiness going on with the others. Its made from a lovely black eyelet lace /  broderie anglaise which I have had lurking in my stash for an age so its nice to finally give it some life!


It would not be a craft blog without a fury pattern weight of some kind waiting in the wings to "help", my chosen species of helper is the cat. And the cat in my life, Beau puts his grumpy mark on everything, curtains, carpet sofa, even this skirt (see below) so why not make a skirt that reflected this impact and full outed me as the crazy cat lady I am.

This is Blue Kitty Polycotton from Minerva Crafts, and it is literally covered in kitty cats (it also comes in red and yellow and green) it must meet Beau's approval as he seemed only to eager to 'help' yet again!

~ ~ ~ ~ ~ ~ ~ ~ ~ ~ ~ ~ ~ ~ ~ ~ ~ ~

So with all these homemade skirts under my belt, there are a few things I have learnt!

Working with polycotton is a lot of fun, as you can see its available in some wonderful and wacky prints, it tends to be lighter in weight than 100% cotton which makes for cool and floaty clothing and due to the blend of synthetic in the fabric it also means that doesn't need much ironing, so no annoying creases at the back from being seated at work all day! There is a downside to using cheaper printed cottons, be they 100% or of the mixture variety, there does tends to be a bit of colour loss on the darker shades once they are washed.

Top left after the wash / Lower right before the wash
I'd expected a little colour loss, I chose not to pre-wash the fabrics before sewing and so found while working that my hands and sewing machine were getting stained with blue dye, wonky donkey skirt I am looking at you!

Also I found that the printing didn't run true to the grain of the fabric, meaning if you have a very obvious stripe in your pattern you may not be able to get the pattern run parallel to say your hem, which is super annoying if your looking for precision, so its worth bearing these things in mind when choosing your fabric!

Anyway these issues aside I love all my bright and breezy skirts its just a shame, though I love autumn, that soon I will have to pack them away for next year, oh well I am looking forward to cozying up in my winter woollies too!!

Wendy x

Tuesday, 20 May 2014

Knit It - Owlet

Hello! Thank you for all your lovely comments on my SFV dress, there are not enough words to say how sweet and kind and just plain wonderful you all are! 

It was while batting with my SFV dress in fact, that I started today's project, as per usual I didn't feel I had enough going on so decided that I needed to add in a knitted project into the mix! This time, it was a very belated birthday present for my friends newest little one, Douggie.


~ Owlet ~
by Kate Davies 
Size: 18 months
Ingredients: 5 mm Circular Needle, 4.5 mm Circular Needle , 4 x 5 mm DPN's,
4 x 4.5 mm DPNs (Double Pointed Needles) & A Cable Needle
Yarn: Worsted Weight Yarn - I doubled up some 4ply Stylecraft Oatmeal


Owlet calls for worsted weight wool which I have struggled to find anywhere here in the UK, I decided to go to my old standby of doubling up my yarn so as I had some yummy Oatmeal coloured 4ply left over from my Brothers Pullover, doubling it up made it about an 8ply (same as DK) and I believe Worsted to be 10ply, but with my slightly baggy tension on circular needles I seem to have gotten away with it.


I bought this pattern not long after joining Ravelry in 2010 and it has been burning a hole in my to-do list since then. The reason for my delay was that I thought it was going to be too difficult I mean look at it those owls they definitely look tricksy, but I could not have been more wrong. After realising I hadn't made little Douggie anything for his birthday, I decided to brave this pattern and quickly discovered it was very simple indeed.

Owlet is knitted entirely in the round, as a new knitter this struck me as a terrifying prospect, I mean no seams where do I hide all my mistakes! But after knitting my fair share of things 'in the round' I can assure you it's the easiest and I would even say the most satisfying way to do stocking stitch. No end of rows to worry about, you can stop mid-round and not loose all your stitches, no purl rows all knit and for some reason, it all seems to knit up soo much quicker than on straight needles! You've got to love that!

Also, the way that this jumper is designed means it is knitted in one piece, you knit your sleeves and body up to a point and then merge the stitches together on one needle and continue knitting to create the owl yoke, it is all rather genius! It also means there are no pesky seams to sew up at the end so as soon as you have cast the blighter off your finished!


Though the owls look tricky they are really easy, they are worked in a very simple cable stitch, which is very quick to remember once you have done a few! I think the most difficult part for me was working the short rows, It baffled me a little, I couldn't understand why I was doing this shaping, but once it was all finished it became clear that it was to create a rise at the neckline on the back of the jumper. Clever!


I only had one problem with this whole pattern and that was I didn't have 5mm DPN's for the sleeves, after you have worked the cuff on the smaller needles you move to the larger 5 mm, but with the tiny amount of stitches I had for each sleeve my very long circular needle was just not going to work. So both of the sleeves have been knitted on 4.5mm DPN's, I did try to make my tension a little looser to compensate I think I have gotten away with it, just, the difference in stitch size is thankfully only really noticeable when you look really closely!


Once all the knitting was done, all that was left to do was to add some eyes to the owls I toyed with the Idea of adding buttons as on the original, but all the buttons in my stash seemed a little too large to work, so I opted for some 4ply wool and some french knots, I think it has worked really well. I just hope its new owner likes it as much as I do! I am actually really tempted to knit myself one, especially as I have just seen that there is an adult sized version called Owls out there just waiting to be knit!


Wendy x

Tuesday, 1 April 2014

Knit It - 'Your Victory' Jumper

 Your Victory Jumper Knitting Free Pattern Knit for victory Wendy Bayford

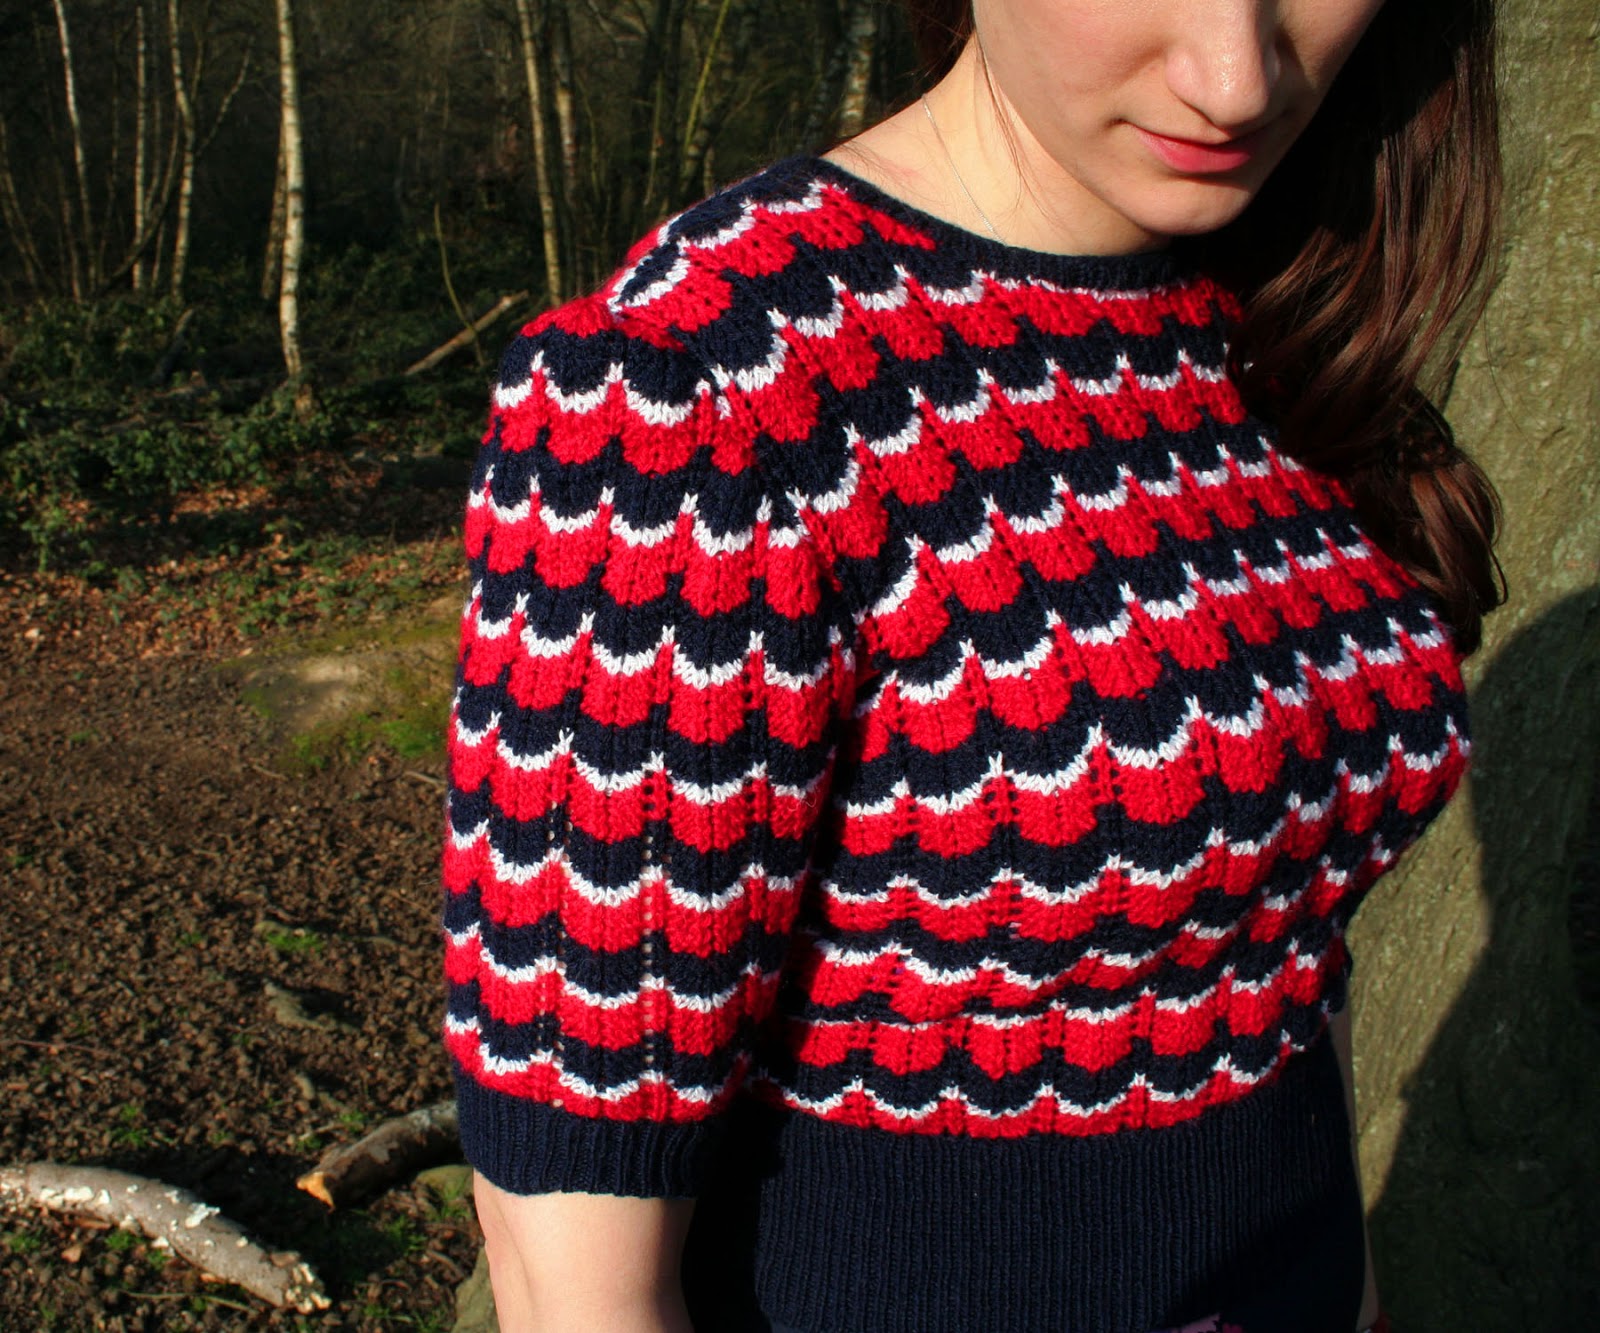
Well, it must have been a miracle with all the things I had going on in January, but I did actually finish my Victory Jumper before the deadline, OK it was right up to the wire at 9pm on 31st, but none the less it was finished and I am rather proud of it, and the fact I persevered despite a pair of sleeves that would not behave themselves makes it even more miraculous!

~ Your Victory Jumper ~
Home Notes 1945 Via the V&A Knitting Archive
Size: 32-34″ bust
Ingredients: UK Size 10 & 12 needles
Yarn: 3 ply yarn I swapped for some Stylecraft 4 ply in Midnight, Red & White
Knit stitches: Knit, Purl, S1 K1 PSSO, K2Tog, YO (wool forward) & pick up stitches

Your Victory Jumper Knitting Free Pattern Knit for victory

The pattern is for a 33-34" bust so I added and extra 18 stitches to the cast on to make it up to about a 38-40" bust, there is quite a bit of negative ease in this pattern (stretch across the row) so I could have probably added a little less, but it's nice to have a bit of extra room  to breathe!

 Your Victory Jumper Knitting Free Pattern Knit for victory Wendy Bayford

I cast this on on Christmas day and was pleasantly surprised at how quick the wavy pattern knits up, it is really very simple! It is worked over 9 stitches K2tog, K2, YO, K1, YO, K2, Slip 1 K1 Passo.  As well as being very easy to remember once you get into it, its also very easy to correct if you make a mistake, generally in my case it was missing a YO, but with a bit of rejigging it was simple to correct, ripping back was not so easy as those yarn overs are a pest to get back on the needle.

Your Victory Jumper Knitting Free Pattern Knit for victory

I flew through knitting the body. To both the front and back I added an extra 2 inches to the length which obviously meant it took a little longer on the needles but it was no hardship. The sleeves I started with great optimism, I usually knit both sleeves at the same time, it probably isn't but it feels quicker that way, with this pattern however there was too much tangling of various yarns going on, I am a bit of a tangle queen when it comes to colour work, so I gave that up after the ribbing.

Your Victory Jumper Knitting Free Pattern Knit for victory

As I worked through the pattern I became more and more baffled as to how long these sleeves were supposed to be. The instructions stated:
 "Change to No. 10 needles and ptn., inc. 1 st. at both ends of  every 6th row until there are   88 sts. Cont, in ptn. until sleeve measures 5.5 ins. from the beg."
Which would mean 8 rows of increase rows, but if I did that with my tension I would have 7" of the sleeve before the shaping, Ugh! So I ripped it back and worked my increases a little more often than once every 6 rows, then commenced the shaping. This with the way the pattern is seemed to be more tricky than it should have been I am sure on some rows I ended up with more stitches than I should have. Ugh!!!!

Your Victory Jumper Knitting Free Pattern Knit for victory

In the end I decided to wing it and try to line the stripes up, on the shaping with the stripes on the armholes on the body, this mean that my sleeves have ended up much puffier than the original pattern and they were supremely fiddly to fit, but at least they are in and all the stripes line up!

Your Victory Jumper Knitting Free Pattern Knit for victory

Though it took me three weeks worth of evenings and weekends to fight with them now they are done I am actually really happy with them, but it will be a while before I tackle anything with sleeves with stripes again!

Your Victory Jumper Knitting Free Pattern Knit for victory

So that's it my Knit for Victory finally out there in the world, only two months late!

If you liked this then do check out Retro Reporter's version she used the Clara sweater Pattern which is a redesign by Rohn Strong, it's totally gorgeous! Plus there are lots of amazing projects to inspire everyone on the Flick Group.

Right now on to Sew For Victory!!
Wendy x

Wednesday, 13 November 2013

Things To Make & Do – Wild West Terrarium

A few months back I needed to make a quick birthday present for my friend Alan, you know the drill you think 'Ooh I must get something really nice for their birthday in a few weeks' then promptly forget until a few days before. After I calmed down from the panic, I realised there was something I could make that would be really quick, would incorporate something of Alan's past into his present (boom, boom!) and be, fingers crossed, something that he would love!

I worked with Alan for many years before he retired. We spent many a pleasant afternoon listening to his stories and old radio plays such as Round The Horn and The Goon Show whilst sipping tea and clicking away at our computers. Some of his most enthusiastic tales were those of his love of playing Cowboys and Indians when he was little in the 50s, so I knew a gift that incorporated this would be a tick in the box. I also knew that before working for our company he had worked at Britains (another scale model company famous for toy soldiers and the like) so I knew that some Britains scale model cowboys would make that a double tick!

So with all of this in mind, my plan was to make him a Western Terrarium, I had made myself two a year or so ago now (they are here on Kollabora), and knew all it would require was a quick trip to the DIY store and a few bits from eBay, which luckily I already had.


Western Terrarium
This is a really quick make, which cost very little and I think looks great!


What you’ll need:
  • A large glass vase, or storm jar
  • Mini cacti - or two depending on size of vase
  • A handful of clean gravel/Compost – Houseplant compost is preferable but not essential
  • Sand – I used children's play sand as it had the perfect colour
  • A scale model or two, this could be anything at all!
  • Spoon or small trowel for inserting the soil and sand
So let's begin...

1. Ensure that your both your vase and gravel are clean, before adding a thick layer to the base of your Vase. I washed my gravel by leaving it some boiling water for a bit and then rinsing it under the tap once cooled.

2. Remove cacti from its pot and arrange in the vase, add a layer of compost, to support the cacti. Be careful, I chose the cacti with the least amount of prickles for this vase, but it still got me!

3. Next, add a thick layer of sand. You will find over time the sand will work its way down the sides of the vase hiding the soil, which may mean you have to add more a little later on.

4. Finally, arrange your chosen figures, and if you desire a bit more realism add some gravel.

Then you are done! Time to sit back and enjoy!

Tips for aftercare:
When I researched terrarium making the general rule was not to use cacti. Boo! Now,I have had no problem with my ones so far, but Cacti do thrive in conditions where they are flooded with water which is then followed by a drought. This is difficult to achieve in a small moisture retaining vase. I get around this by watering once every 3 weeks or so and using a squirty bottle (it was recycled from a hair dye kit, washed thoroughly) to aim the water directly at the roots give it a good glug, this way it's not filling the whole vase and so gives the cacti enough water to make it happy.

If I had given myself a little more time I would have loved to have fashioned some tombstones out of polymer clay, to give it that added touch, but either way Alan was as pleased as punch with his unique gift and told me he remembers working on the technical drawings for some cowboys during his time at Britains, so it could well be he had drafted one of these! 

Wendy x